⚡ Storm or Roof Damage? Get a FREE Estimate
Text ESTIMATE to (844) 907-2546
Or call (800) 792-0212 for 24/7 emergency response
AI-powered • No obligation • Licensed IL & WI
Introduction
Roofs serve as the first line of defense against various environmental elements, and their integrity is crucial for protecting your property. In the construction and restoration of roofs, particular attention must be paid to elements that penetrate the roof’s surface—vents, flue stacks, chimneys, and skylights, to name a few. These are the areas most susceptible to leaks and water damage if not properly flashed and sealed. This blog post delves into the critical aspects of flashing around various roof penetrations to maintain the durability and effectiveness of your roofing system.
What is Flashing and Why is it Necessary?
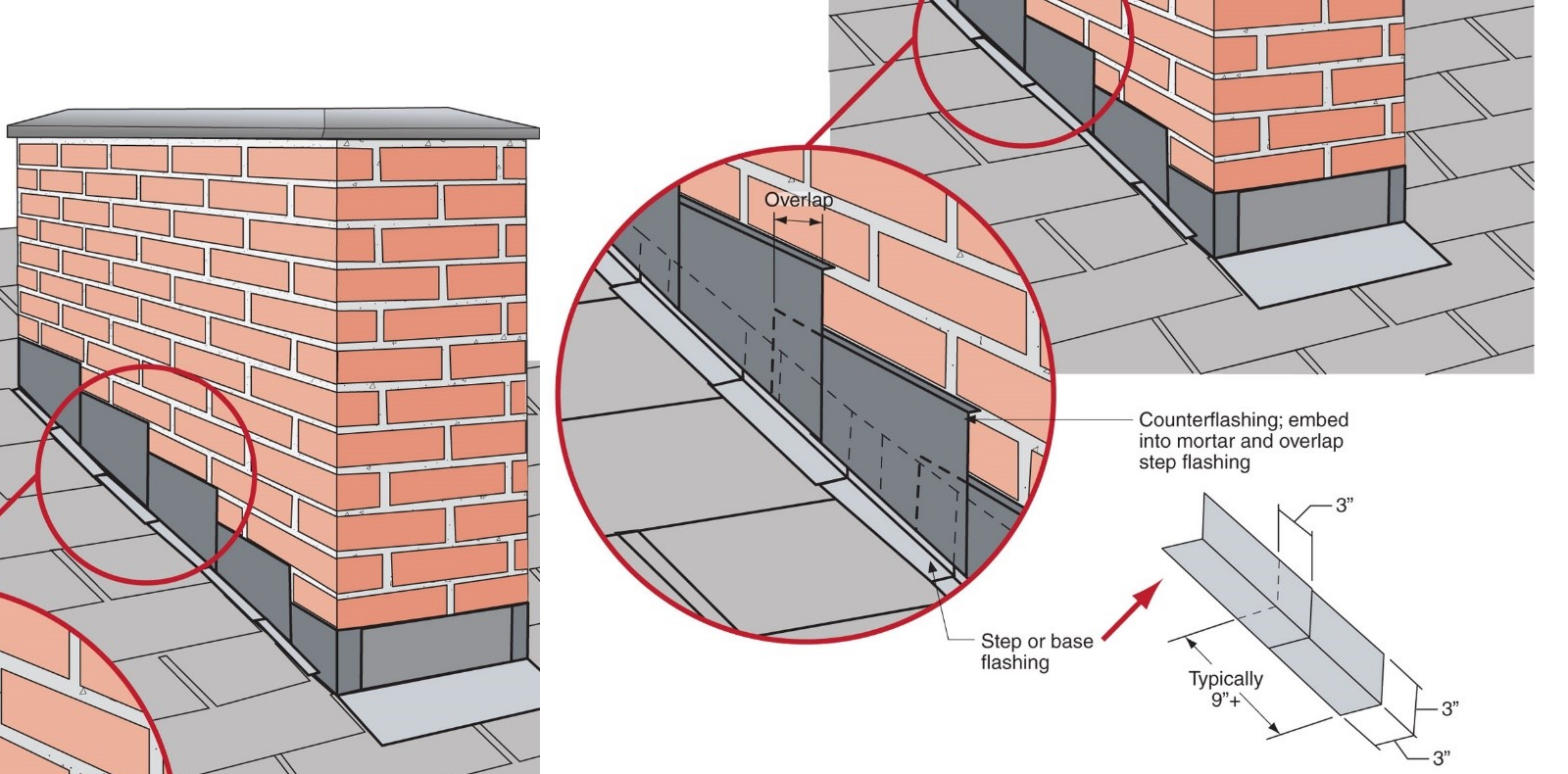
Flashing is a material—usually metal—that is used to direct water away from areas of your roof that are prone to leaks. Whenever a penetration is made through the roof, proper flashing installation is indispensable for maintaining the integrity of the roof’s water control layer. This layer consists of the roof covering, underlayment, and any weather-resistant barriers over the roof decking.
The Principle of Water Management
Effective water management is the cornerstone of durable roof assemblies. The primary objective is to direct water away from the building structure. To achieve this, roofs should be sloped, and any penetrations must be correctly flashed. Drainage planes or membranes around penetrations should be integrated seamlessly into the roof’s water control layer.
Note: Even so-called “flat” roofs should have a minimum slope of 1/4:12 to facilitate drainage.
Steps for Flashing Around a Vent Pipe in a Sloping Roof
Preliminary Inspection
- Inspect the integrity of the roof system, checking for deficiencies, water damage, or active leaks.
- Examine the structural integrity of the roof framing for any deficiencies like rot or insect damage.
Installation Procedure
- Cutting and Sealing: Cut a hole through the roofing that is 0.5 inches larger than the pipe. Install a closed-cell foam backer rod and urethane sealant in the hole as an air control layer.
- Insulation and Sheathing: Install insulating sheathing in multiple layers. Install another layer of foam backer rod and urethane sealant at the pipe perimeter.
- Plywood Over Insulation: Install 5/8-inch plywood roof sheathing over the insulating layers. Cut the plywood to fit snugly around the pipe.
- Peel-and-Stick Membrane: Install two sections of peel-and-stick roof membrane extending 18 inches from the vent pipe. The membrane should lay flat around the pipe.
- Flashing Membrane: Install a formable self-adhered flashing membrane around the pipe, overlapping the down-slope section of the peel-and-stick membrane.
- Shingle Installation: Install asphalt shingles, stopping just below the pipe. Then install the metal/rubber flashing collar, followed by additional shingles around and above the pipe.
General Flashing Guidelines
- Use corrosion-resistant metal flashing.
- Fasten all metal flashing at a maximum of 6 inches on center at the edges.
- Prime metal surfaces with ASTM D41 primer.
- Use approved flashing cement as per the roof system manufacturer’s instructions.
Scope of Work
When engaging in a reroofing project or adding new roof penetrations during a renovation, it’s crucial to establish a comprehensive scope of work that addresses not only the new elements but also existing ones. Specifically, the scope should include:
- Inspection: Thoroughly inspect all penetrations through the roof to ascertain whether proper flashing and other water management details are in place.
- Flashing Installation: Apply flashing where missing around all new and existing roof penetrations.
- Shingle-Style Water Control: Install water control materials in a shingle fashion to ensure that water drains down and away from the building structure.
Compliance Considerations
Regulatory compliance is non-negotiable when it comes to roof installations and renovations. Below are some key guidelines and codes:
ENERGY STAR Single-Family New Homes, Version 3/3.1 (Rev. 11)
- Water-Managed Roof Assembly: Requirements include step and kick-out flashing at all roof-wall intersections, boot/collar flashing at all roof penetrations, and specific provisions for homes with certain foundation types.
International Residential Code (IRC)
- Venting of Appliances (G2427): Ensures proper venting systems.
- Roof Penetrations (P2606): Requires roof penetrations to be sealed.
- Waterproofing of Openings (P2607): Mandates that roof penetrations be flashed.
- Solar Thermal Energy Systems (M2301): Requires roof and wall penetrations for solar systems to be flashed and sealed.
- Flashing (R903.2): Ensure corrosion-resistant materials are used and properly installed at all roof intersections and penetrations.
Retrofit Guidelines
According to IRC Section R102.7.1, all additions, alterations, or repairs must conform to the existing code, without requiring the unaltered portions of the existing building to do so, unless otherwise stated.
Compliance Footnotes
- Alternative Measures: Various alternatives and exemptions exist, such as rainwater harvesting systems and specific soil assessments.
- Product Standards: EPA recommends, but does not require, that products meet ASTM D1970 for membrane installations.
Implementation Timeline
Always refer to the ENERGY STAR Single-Family New Homes Implementation Timeline to understand which program version and revision is currently applicable in your state.
Conclusion
Flashing around roof penetrations is not just an added step; it’s a critical component in the overall roof system. A correctly flashed roof can save you from the repercussions of water damage, including expensive repairs and insurance claims. If you’re facing issues with your current roofing system or are planning a new installation, proper flashing should never be overlooked.
For more personalized guidance, consult with engineers and local building codes specific to your location. For immediate service or consultation, you may contact us at Allied Emergency Services, INC.
Contact Information:
- Phone: 1-800-792-0212
- Email: Info@AlliedEmergencyServices.com
- Location: Serving Illinois, Wisconsin, and Indiana with a focus on the greater Chicago area.
If you require immediate assistance or have specific questions, our human support is readily available to help you.
Disclaimer: This article is intended for informational purposes only. For professional advice, consult experts in the field
⚡ Need Storm Damage Help? We Serve 155+ Cities
Allied Emergency Services provides 24/7 emergency restoration across Illinois, Wisconsin, Indiana, and Michigan. Text ESTIMATE to (844) 907-2546 for a free estimate in minutes.
Top service areas: Chicago • Naperville • Aurora • Kankakee • Joliet • Rockford • Schaumburg • Milwaukee • Madison • We’re Hiring!
⚡ Storm or Roof Damage? Get a FREE Estimate
Text ESTIMATE to (844) 907-2546
Or call (800) 792-0212 for 24/7 emergency response
AI-powered • No obligation • Licensed IL & WI
Need roofing help?
Allied Emergency Services — Licensed IL & WI Roofing Specialists
For 27 years, Allied has been building and restoring roofing across Illinois and Wisconsin. IICRC-certified, EPA Lead-Safe, IL Licensed Roofing Contractor #104.019029. 24/7 emergency response.
Learn about our Roofing service →Free property assessment within 24 hours · No obligation · Insurance claim support