⚡ Storm or Roof Damage? Get a FREE Estimate
Text ESTIMATE to (844) 907-2546
Or call (800) 792-0212 for 24/7 emergency response
AI-powered • No obligation • Licensed IL & WI
Allied Emergency Services, Inc. is dedicated to ensuring your roofing project meets the highest standards of quality and durability. That’s why we recommend Pinnacle® Pristine roofing products for their superior protection and performance. Here’s what you need to know about installing these premium shingles:
- Lifetime Limited Warranty Eligibility: Available exclusively for single-family, site-built, detached residences. Other properties, including those owned by governmental agencies, corporations, and various organizations, are covered by a 50-year limited warranty.
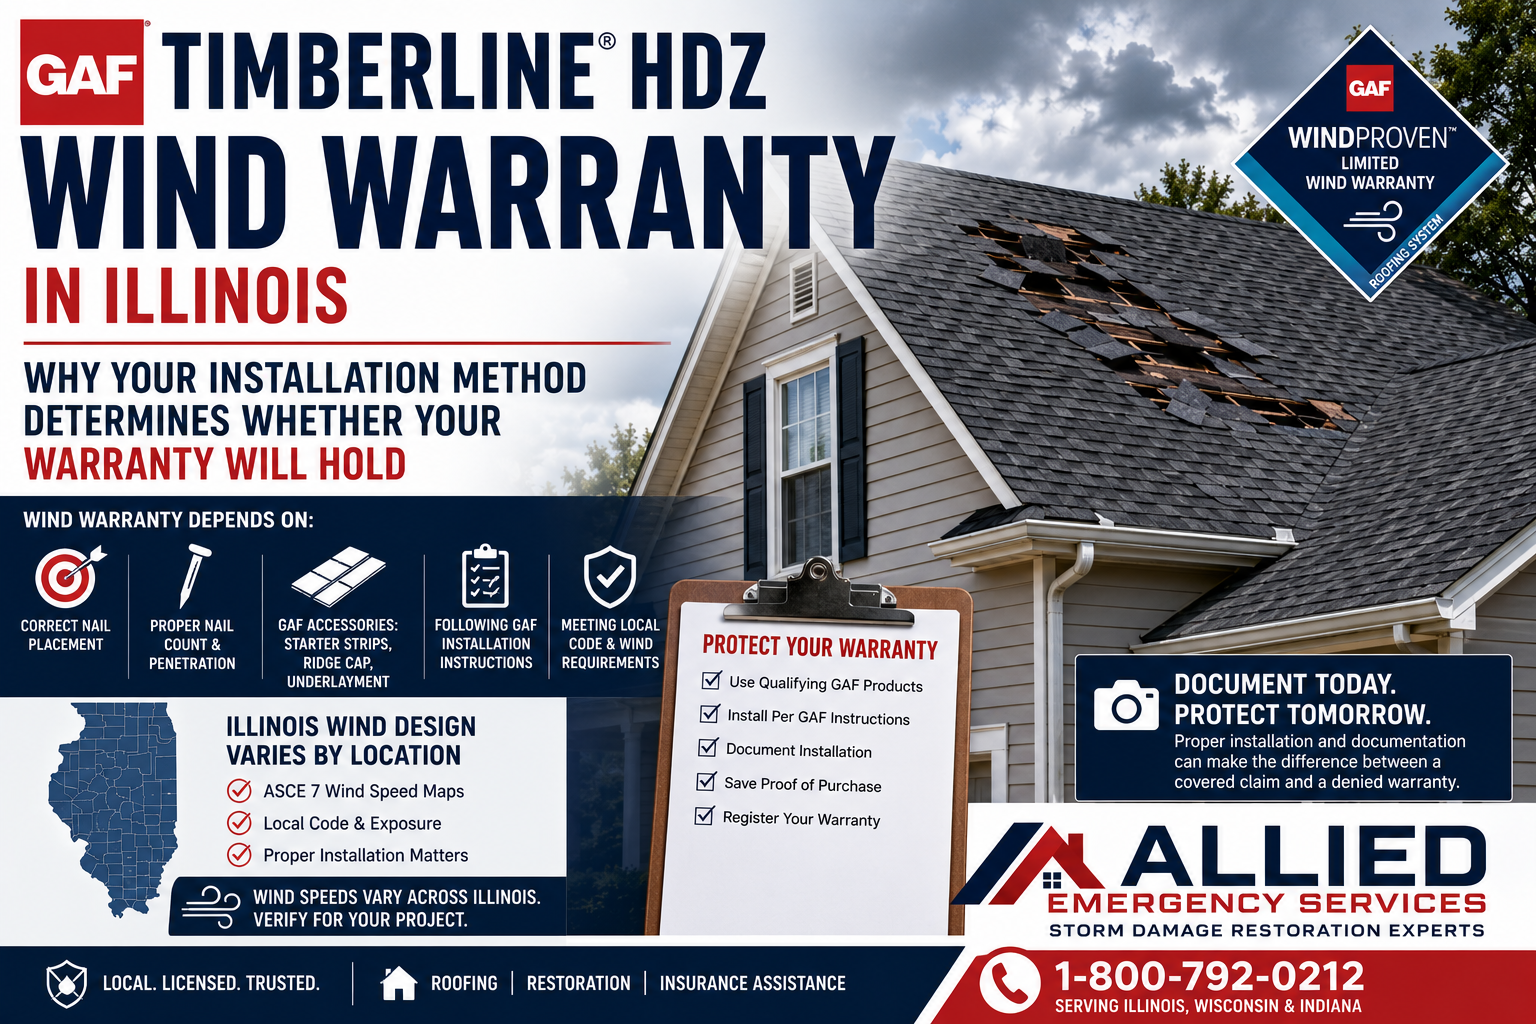
- Wind Resistance: Pinnacle® Pristine shingles, built with HP42® Technology, are warranted against manufacturing defects and can withstand wind gusts up to 130 MPH when installed with the standard 4 nail technique.
- Warranty Registration: To activate the Pinnacle® Pristine Limited Warranty, register online at AtlasRoofing.com/Warranty or contact Atlas Roofing Corporation directly.
Key Installation Instructions:
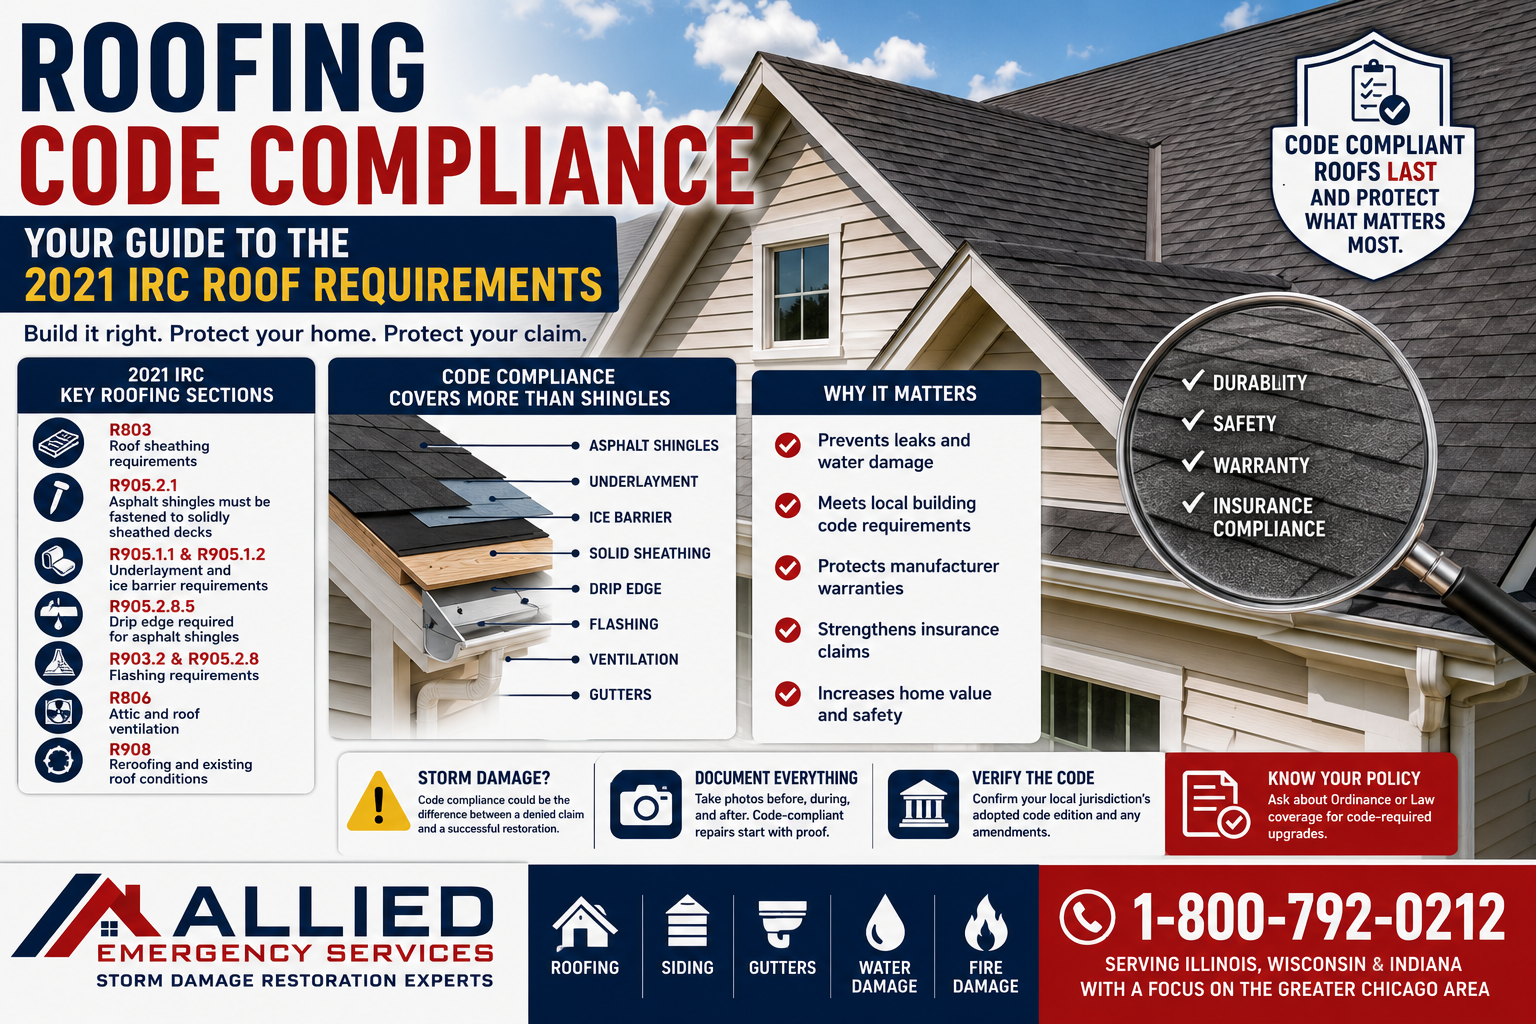
- Roof Deck Ventilation: Ensure proper ventilation to prevent condensation and heat buildup, which could lead to accelerated weathering and other damage. Ventilation must meet or exceed FHA Minimum Property Standards.
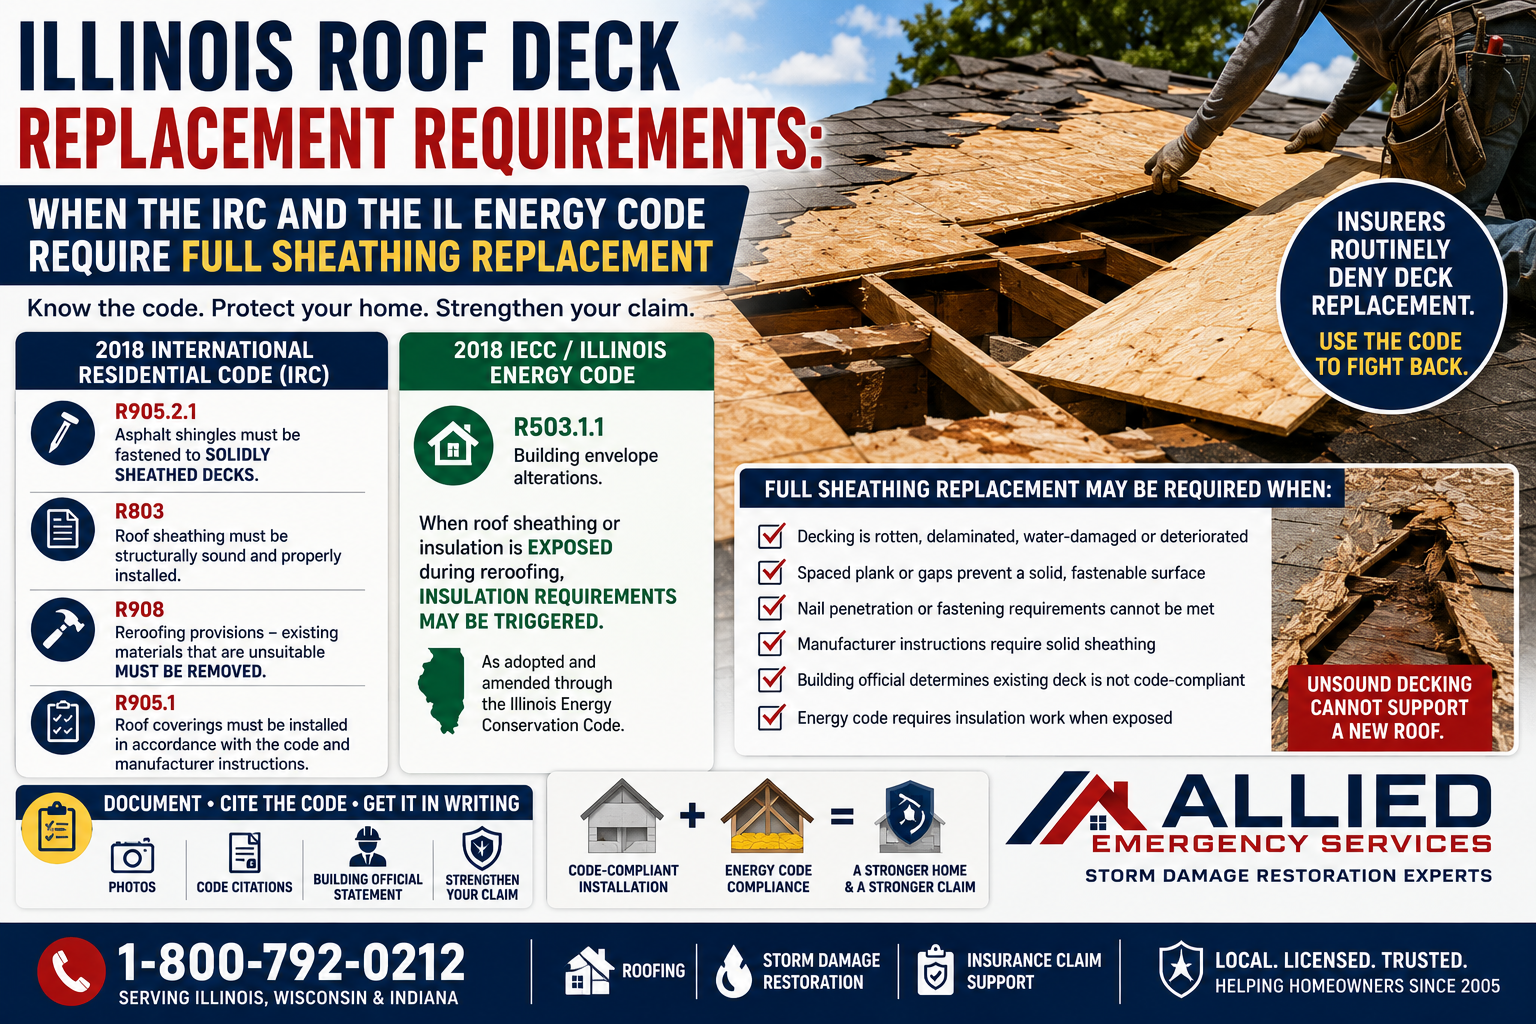
- Appropriate Decking: Use nominal 3/8” or 7/16” thick APA/TECO rated plywood, OSB decks, or minimum ¾” actual thickness wood decking. Make sure the deck is clean, bare, and flat for optimal shingle application.
- Underlayment: High-performance, ASTM compliant underlayment like Gorilla Guard®, Everfelt™, or Summit® is recommended for long-term performance. Metalized or metal-containing radiant barriers as underlayment will void the warranty.
- Flashing: Install cap and base flashings at all vertical surfaces before shingle installation. This prevents water infiltration and ensures a watertight seal around chimneys, skylights, and vents.
- Ice Dam Protection: In regions prone to ice damming, install eave and rake edge waterproof flashings as per local building codes to prevent water backup under the shingles.
- Valley Installation: Choose between open and closed valley installation methods, ensuring proper water flow and preventing leaks.
- Fastening: Use 11- or 12-gauge corrosion-resistant roofing nails, ensuring correct placement for maximum wind resistance and preventing delamination.
- Shingle Application: Follow precise starter course, first course, and subsequent course instructions to achieve the best appearance and performance.
- Steep Slope and Mansard Applications: Extra precautions, including additional nail placement, are required for roofs with slopes exceeding 60°.
- Hip and Ridge: Use Pro-Cut® Hip & Ridge shingles for matching appearance and warranty coverage.
- Re-Roofing Over Asphalt Shingles: Ensure all existing shingles are in good condition and properly prepared before overlaying new shingles for a refreshed look.
Safety First: Remember, roofing is inherently dangerous. Follow all safety guidelines and consider professional installation to ensure a secure and effective roofing project.
Roof Deck Ventilation
- Essential to prevent harmful winter condensation and summer heat build-up.
- Avoids accelerated shingle weathering, deck rot, attic fungus, shingle distortion/cracking, and cosmetic blisters.
- Atlas’s Stance on Ventilation:
- Atlas disclaims responsibility for shingle damage due to inadequate ventilation.
- Ventilation Standards:
- Must meet or exceed FHA Minimum Property Standards and all building codes.
- Utilize a combination of vents at both the ridge and eaves for optimal air circulation.
- All roof types, especially mansard and cathedral ceilings, require thorough ventilation from eave to ridge.
- FHA Ventilation Requirements:
- 1 square foot of net free attic vent area for every 150 square feet of attic floor area.
- If a vapor barrier is installed on the ceiling’s warm side, the requirement adjusts to 1 square foot per every 300 square feet.
- For effective ventilation, at least half of the vent area should be near the ridge.
Roof Deck
- Deck Surface Requirements:
- Must be clean, bare, gap-free (less than 1/4”), and flat.
- Material Restrictions:
- Pinnacle® Pristine shingles cannot be applied to non-ventilated, insulated decks or materials like perlite board, plastic foam, fiberboard, and similar materials.
- Installation on Atlas CrossVent® Nailable Insulation panels is approved.
- Warranty Considerations:
- Applying shingles directly to inappropriate materials or without proper ventilation voids the warranty.
- Radiant Barrier Systems:
- Shingles may be installed over roof systems with a radiant barrier if specific conditions are met:
- Full, flow-through ventilation is maintained under the decking.
- The radiant barrier material is highly vapor permeable (> 2 perms).
- The radiant barrier is installed on the underside of or below the decking, not as an underlayment.
- Spray-on radiant barriers considered on a case-by-case basis, pending permeability verification.
- Shingles may be installed over roof systems with a radiant barrier if specific conditions are met:
- Application limited to 3/8” or 7/16” thick APA/TECO rated plywood, OSB decks, or minimum ¾” actual thickness wood decking.
- Compliance with APA/TECO roof deck specifications is mandatory.
- Solid wood decking should be well-seasoned, not exceed 6” in width, and securely fastened to each rafter.
Underlayment
- Application Guidelines:
- Underlayment must be applied flat and unwrinkled.
- Compliance with local building codes or manufacturer’s requirements is mandatory.
- Organic underlayment felt should not be exposed for prolonged periods; apply shingles the same day as felt to avoid wetting and wrinkling.
- Summit® Synthetic Underlayment recommended for prolonged dry-in, up to 6 months exposure.
- Standard Slope Application:
- For slopes 4:12 to 21:12, a single layer of approved underlayment is required.
- Install underlayment parallel to eaves, overhanging 1/4″ to 3/8″, with fasteners 2” from deck edge and 12” O.C.
- Ensure 2” overlap parallel to eaves and a minimum of 4” end lap, with staggered end laps 6 feet apart.
- Place corrosion-resistant drip edge over the underlayment at the rake and beneath it at the eaves.
- Low Slope Application:
- For slopes 2:12 to 4:12, a double layer of approved underlayment is necessary.
- Atlas WeatherMaster® Ice & Water products recommended for entire deck coverage.
- Begin with a 19” strip at eaves, overhanging 1/4″ to 3/8″, and cover with a 36” wide strip, exposing the first course 17”.
- Continue with 36” wide strips, lapping each course 19” over the previous one for a 17” exposure.
- End laps should have at least 12” overlap and be staggered 6 feet apart.
- Install drip edge over the underlayment at the rake and beneath it at the eaves for both standard and low slope applications.
- Atlas recommends high-performance, ASTM 6757 compliant underlayments: Gorilla Guard®, Everfelt™, Summit®, and WeatherMaster® products for critical areas.
- Metalized or metal-containing “Radiant Barrier” underlayments are not approved and void the warranty.
Flashing
- Ice Dam Protection Measures:
- Install eave and rake edge waterproof flashings as per local codes, especially where ice damming is possible.
- Atlas WeatherMaster® products or equivalents should cover the decking, extending 24” beyond the interior warm wall line for ice dam protection, and conform to ASTM D-1970.
- In severe icing areas, the material must reach up to the highest expected water level from ice dams.
- For overhangs wider than 36″, ensure the horizontal lap is cemented or sealed, with a minimum of 12” end laps also cemented/sealed.
- Valley Construction Techniques:
- Complete valleys before laying Pinnacle® Pristine shingles.
- Open Valley: Center a 36” ice & water product in the valley, followed by a minimum 16” wide copper flashing (or equivalent), secured every 24” along both edges. Ensure a minimum of 12” overlaps in the copper.
- Mark chalk lines 3” from the center line on each side of the valley for shingle trimming, cutting 2” diagonally off the upper corner of shingles adjacent to the line to direct water into the valley.
- Set valley edges of shingles in a 3” wide band of asphalt plastic cement (meeting ASTM D-4586) and nail no closer than 6” from the valley center line.
- Ensure all flashing is in place prior to installing shingles.
- Use cap flashings of sheet metal and base flashings of metal or mineral-surfaced roll roofing at vertical surfaces (e.g., chimneys, skylights).
- Seal all flashings with asphalt plastic cement.
- For detailed installation methods, refer to the ARMA Residential Asphalt Roofing Manual.
- Closed Cut Valley Installation:
- Center a 36” wide ice & water product in the valley, securing it 2” from the edges.
- Lay shingles across the valley, extending a minimum of 12” beyond the valley center on one side.
- On the opposite side, mark a chalk line 2” from the valley center and apply shingles up to this line, trimming as necessary without cutting the shingle underneath.
- Trim the upper corners of the shingle for a neat finish, secure with cement, and nail down properly.
- Closed Cut Valley Installation:
- Fastening Guidelines:
- Nail placement is crucial for shingle performance and durability.
- High nail placement can lead to component separation and shingle delamination, not covered under warranty.
- Use 11- or 12-gauge corrosion-resistant roofing nails with a minimum head of 3/8”.
- Nails must penetrate the roof deck by 3/4″ or, for decks less than 3/4″ thick, penetrate fully and extend at least 1/8” through the roof deck.
- Nails should be driven straight and flush with the shingle surface without cutting into it.
- New Roofing Application:
- Apply four nails per shingle, 7” up from the bottom edge.
- Place one nail approximately 1” from each side of the shingle, with the other two nails evenly spaced between them.
- All nails must be a minimum of 1-1/4” long to ensure proper fastening.
Shingle Application
- Deck Preparation:
- Ensure the deck is ready with approved underlayment, drip edges, and flashings.
- Use horizontal and vertical chalk lines for shingle alignment from eave to ridge.
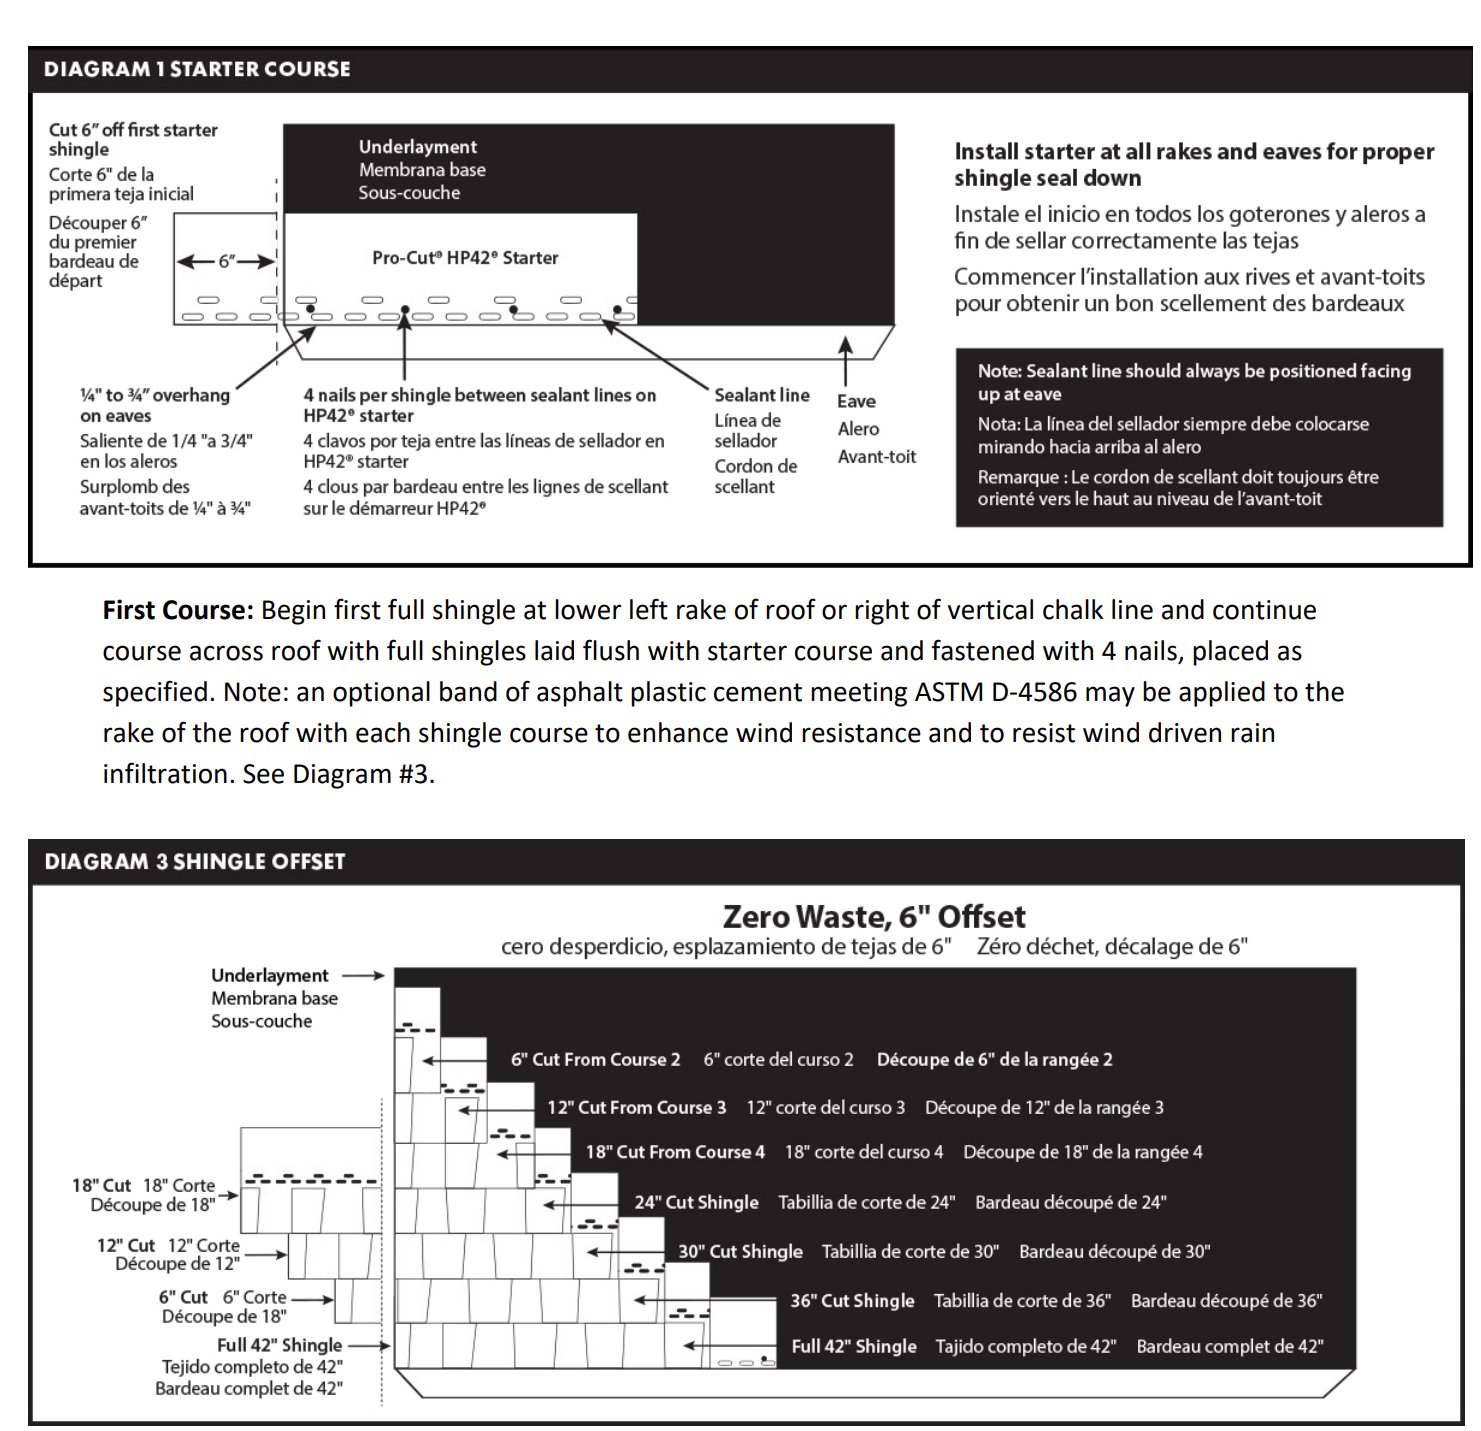
- Starter Course:
- Utilize Pro-Cut® Starter Shingles or 3-tab shingles, trimming off tabs for a 1/4” to 3/4” eave overhang.
- Align the seal-down feature with the eave and start application at the lower left rake, securing with 4 nails 3” up from the eave.
- First Course:
- Begin with a full shingle flush with the starter course, fastening with 4 nails as specified.
- Optionally, apply asphalt plastic cement along the rake for enhanced wind resistance.
- Subsequent Courses:
- Second Course: Cut 6” from a shingle, apply over the first course with a 6” exposure, and save the cut piece.
- Third Course: Cut 12” off, apply the larger piece over the second course with a 6” exposure, and save the cut piece.
- Fourth Course: Cut 18” off, apply the remainder over the third course with a 6” exposure, and save the cut piece.
- Fifth Course: Use the 18” piece cut from the fourth course or cut a new piece, maintaining a 6” exposure.
- Sixth Course: Apply the 12” piece saved from the third course or cut a new piece, maintaining a 6” exposure.
- Seventh Course: Use the 6” piece saved from the second course or cut a new piece, maintaining a 6” exposure.
- Course Completion:
- Continue the application with full shingles across the roof, repeating the staggered course cycle to ensure proper pattern appearance and roof coverage.
Hip and Ridge Installation
- Utilize Pro-Cut® Hip & Ridge or Pro-Cut® High Profile Hip & Ridge shingles for Scotchgard™ Limited Warranty Coverage.
- Ensure shingles are warm and flexible to prevent cracking, especially in cold climates.
- Apply these shingles with a 5-5/8” exposure, starting from the bottom of the hip or ridge against the direction of prevailing winds.
- Fasten each shingle with two nails, placed 6” back from the exposed end and 1” up from the edge, ensuring subsequent shingles cover the nail heads.
- Trim the final shingle to fit, securing it with plastic cement.
- Ridge Vent Installation:
- Follow the vent manufacturer’s instructions when installing ridge vents to ensure compatibility and performance.
Re-roofing Over Asphalt Shingles
- Replace any missing shingles and secure any buckles, raised tabs, or curled shingles.
- Verify attic ventilation meets FHA Minimum Property Standards.
- Apply a layer of #30 felt underlayment for a Class A fire rating over the old shingles before installing new shingles.
- Atlas recommends using 2” nails for re-roofing applications but does not approve re-roofing over existing wood shingles or laminated asphalt shingles.
- Slope Requirements:
- Standard slope requirements mandate not less than 4 inches per foot for new installations.
- Low slope requirements apply to slopes of not less than 2 inches per foot.
- Safety Precautions:
- Roofing can be hazardous; adhere strictly to safety guidelines and best practices.
- Minimize roof traffic and perform maintenance during cooler parts of the day to ensure safety and prevent damage.
For immediate service or consultation, you may contact us at Allied Emergency Services, INC.
Contact Information:
- Phone: 1-800-792-0212
- Email: Info@AlliedEmergencyServices.com
- Location: Serving Illinois, Wisconsin, and Indiana with a focus on the greater Chicago area.
If you require immediate assistance or have specific questions, our human support is readily available to help you.
Disclaimer: This article is intended for informational purposes only. For professional advice, consult experts in the field.
⚡ Need Storm Damage Help? We Serve 155+ Cities
Allied Emergency Services provides 24/7 emergency restoration across Illinois, Wisconsin, Indiana, and Michigan. Text ESTIMATE to (844) 907-2546 for a free estimate in minutes.
Top service areas: Chicago • Naperville • Aurora • Kankakee • Joliet • Rockford • Schaumburg • Milwaukee • Madison • We’re Hiring!
⚡ Storm or Roof Damage? Get a FREE Estimate
Text ESTIMATE to (844) 907-2546
Or call (800) 792-0212 for 24/7 emergency response
AI-powered • No obligation • Licensed IL & WI
Need roofing help?
Allied Emergency Services — Licensed IL & WI Roofing Specialists
For 27 years, Allied has been building and restoring roofing across Illinois and Wisconsin. IICRC-certified, EPA Lead-Safe, IL Licensed Roofing Contractor #104.019029. 24/7 emergency response.
Learn about our Roofing service →Free property assessment within 24 hours · No obligation · Insurance claim support