⚡ Storm or Roof Damage? Get a FREE Estimate
Text ESTIMATE to (844) 907-2546
Or call (800) 792-0212 for 24/7 emergency response
AI-powered • No obligation • Licensed IL & WI
A whole-house draft barrier is a continuous layer of air-tight materials designed to prevent air leaks in a building. This barrier not only blocks the movement of air but can also serve multiple functions, including:
- A whole-house draft barrier is crucial for blocking air leaks and ensuring energy efficiency.
- It also serves as a water barrier, thermal barrier, and vapor barrier when integrated with other materials.
Benefits of Whole-House Draft Barriers:
- Enhances energy efficiency, reducing wasted energy.
- Improves overall comfort, reducing drafts and temperature fluctuations.
- Enhances sound insulation, providing a quieter living space.
- Increases durability, protecting the building structure.
Scope: Ensuring Proper Installation:
- Install a rigid air barrier to separate the porch attic from the conditioned space.
- Insulate exterior wall cavities without misalignments, compressions, gaps, or voids.
- Use continuous rigid air barrier materials like rigid foam insulation, drywall, plywood, or OSB.
- Seal the air barrier to the framing with caulk applied to the exterior face.
- Seal all seams, gaps, and holes in the air barrier with caulk or foam.
- Ensure the air barrier maintains full contact with the insulation.
Spray Foam Insulation:
- Spray foam insulation can serve as the air barrier if it meets thickness requirements (5.5 inches for open-cell or 1.5 inches for closed-cell).
Description:
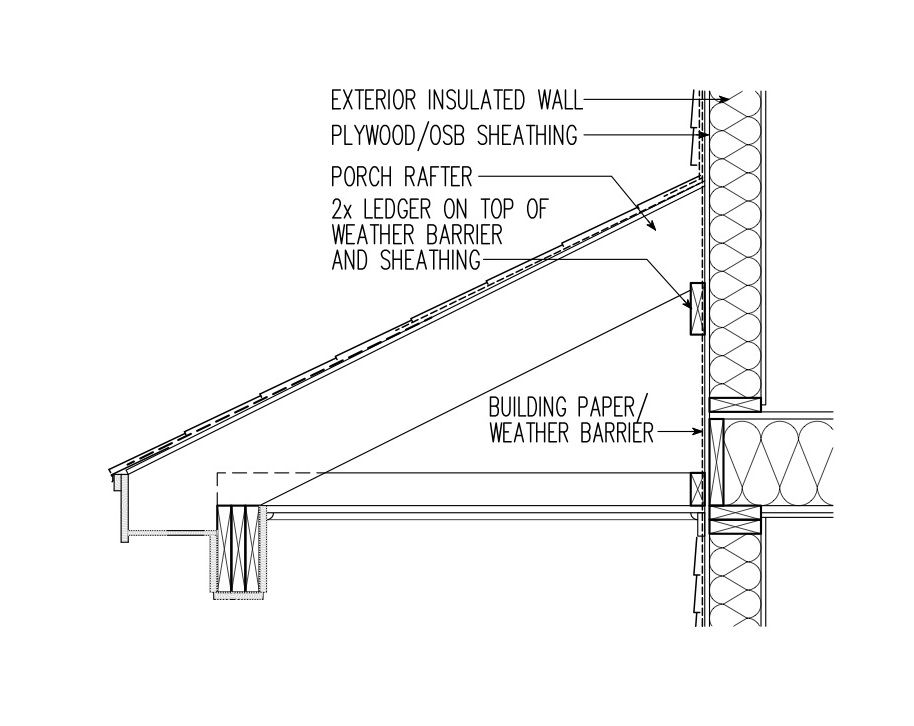
- Challenges in two-story homes with covered porches when wall areas are hidden by porch ceilings.
- Importance of exterior sheathing as an air barrier to prevent wind washing.
- Considerations for homes with vented attics and unvented attics.
Installation Steps for Fully Aligned Air Barriers
- Extend exterior wall sheathing to or beyond porch roof rafters.
- OR – If drywall is already installed, ensure insulation fully aligns with interior sheathing.
- Apply a thick bead of caulk to the framing.
- Install exterior wall sheathing over the caulk.
- Seal sheathing seams.
- Complete with a porch ceiling or exterior siding.
Retrofit Wall Adjoining a Porch Roof In Existing Homes
Scope:
- Retrofitting involves improving energy efficiency by air sealing and insulating the wall adjoining an existing porch roof.
- Two retrofit scenarios are outlined:
- Deep energy retrofits involving the removal of porch framing, roof, and ceiling, followed by the installation of exterior sheathing, water control membrane, insulation, and porch framing re-installation.
- Retrofits with porch framing and roof remaining in place, involving the removal of the porch ceiling to access the wall, inspecting for water leakage, repairing as needed, installing insulation, exterior sheathing, and finishing with porch ceiling or exterior siding.
Description:
- Ideally, exterior sheathing of the house should run continuously along exterior walls, even where porch framing intersects, creating a separation between the porch and conditioned house areas.
- In deep energy retrofits, porch roof framing may be temporarily removed to add sheathing and/or rigid insulation from the exterior before re-installing or replacing porch framing.
- If removing the porch roof framing is impractical, improvements can still be achieved by air sealing and insulating the wall from the exterior after removing only the porch ceiling.
- Figure 1 illustrates foil-faced rigid insulation and canned spray foam providing an air-sealed barrier between the porch roof and the home’s exterior wall.
- The retrofit process includes steps for both deep energy retrofits and retrofits with porch framing in place:
- For deep energy retrofits: Removal of porch framing, installation of insulation, exterior sheathing, water control membrane, ledger, and porch framing re-installation, with proper flashing at the porch roof-to-wall interface.
- For retrofits with porch framing in place: Removal of a section of the porch ceiling, inspection for water leakage, insulation installation, exterior sheathing with caulking or taping seams, and porch ceiling replacement or exterior siding installation.
How to Retrofit a Wall Adjoining a Porch Roof
For Deep Energy Retrofits:
- Remove the porch framing, roof, and ceiling. Alternatively, detach and provide temporary support for the porch roof structure if it will be reused.
- Install insulation in the area of the wall that adjoins the porch if wall cavity insulation is missing or insufficient.
- Install exterior sheathing to create a continuous barrier.
- Install a water control membrane to prevent moisture infiltration.
- Install a new ledger over the face of the sheathing, and provide blocking as needed for structural support.
- Re-install or replace the porch framing.
- Provide flashing at the porch roof-to-wall interface, ensuring integration with the drainage plane of the water control membrane of the house and the porch roof.
For Retrofits with Porch Framing and Roof in Place:
- Remove a sufficiently large section of the porch ceiling nearest the wall to allow space to work on the wall.
- Inspect the existing porch-to-wall interface for signs of water leakage, such as water stains and rot. Remove any wet, sagging, or pest-infested insulation.
- Replace any damaged framing and repair porch roof flashing if needed.
- If insulation is missing or insufficient in the section of the wall adjoining the porch, install insulation to fill the wall cavities. While sprayed polyurethane foam (SPF) insulation improves air tightness, batt or blown insulation can also be used.
- Apply caulk on the exterior face of the framing, then install sheathing (options include plywood, OSB, or rigid insulation) as specified in the Description tab. Ensure seams are caulked or taped for air sealing.
- Consider installing rigid insulation under or over plywood or OSB sheathing to enhance thermal performance.
- Finally, replace the porch ceiling or cover the wall with exterior siding to complete the retrofit.
Ensuring Success:
- A visual inspection by the site supervisor is crucial to verify that the wall cavity, which separates the house from the porch attic, is correctly filled with insulation that maintains full contact with the interior drywall. Additionally, it should be confirmed that the wall cavity is entirely covered with rigid sheathing that forms a continuous air barrier along the exterior wall of the house.
- For comprehensive assessment, consider conducting blower door testing in conjunction with an inspection using an infrared camera. This can help detect any air leakage issues or insulation misalignment within the porch wall.
Climate:
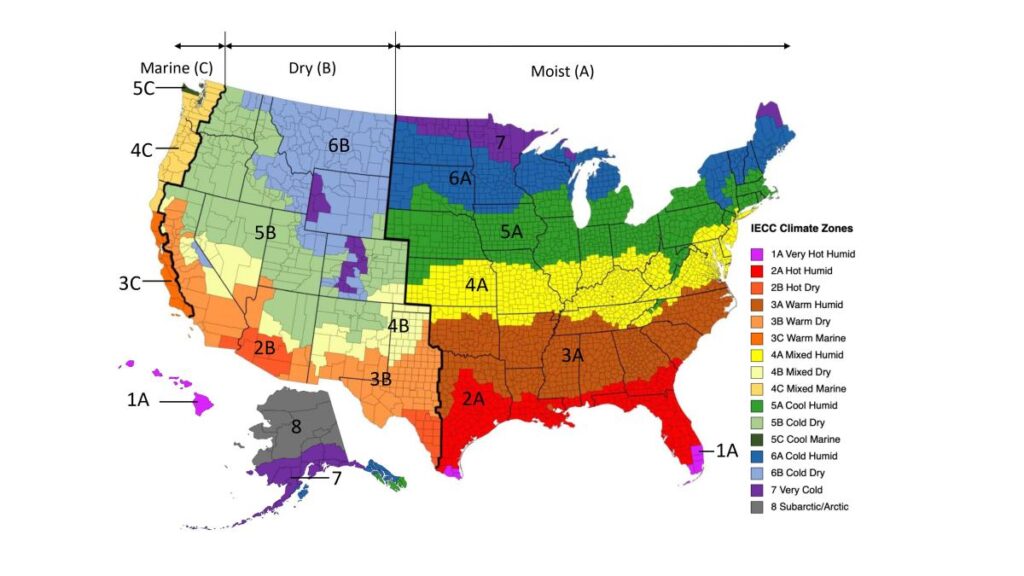
- Understanding the climate zones is vital when implementing fully aligned air barriers. The map shows the climate zones for states that have adopted energy codes equivalent to the IECC 2021. These climate zones determine the specific requirements and standards for insulation and air barriers based on regional climate conditions.
Compliance with Codes and Standards
ENERGY STAR Single-Family New Homes, Version 3/3.1 (Rev. 11):
- Rater Field Checklist includes requirements for Thermal Enclosure System.
- Fully-Aligned Air Barriers must be provided at specific locations, including walls, floors, and other areas.
- Definitions and specifications for air barriers are outlined in Footnote 7.
- Exceptions and recommendations for air barriers in various zones and situations are detailed in Footnotes 9, 11, 12, and 13.
DOE Zero Energy Ready Home (Revision 07):
- Exhibit 1 outlines mandatory requirements for certification.
- Exhibit 2 specifies insulation requirements and Grade 1 installation for ceilings, walls, floors, and slabs.
- The program offers prescriptive and performance paths for builders, with specific HVAC efficiency requirements.
- Insulation and infiltration requirements are based on zones and whole house leakage limits.
American Society for Testing Materials (ASTM) E1677-11:
- Standard Specification for Air Barrier (AB) Material or System for Low-Rise Framed Building Walls.
- The specification provides criteria for air barrier materials/systems in low-rise buildings, allowing customization for different climates and functions.
2009-2021 IECC and IRC Insulation Requirements Table:
- Minimum insulation requirements for ceilings, walls, floors, and foundations in new homes are summarized from various code editions (2009, 2012, 2015, 2018, and 2021 IECC and IRC).
2009 International Energy Conservation Code (IECC):
- Table 402.4.2 outlines criteria for air barriers and insulation in exterior framed walls.
- Specific requirements for insulation, air barriers, and testing are specified in different code sections based on the year of the code edition.
2012 IECC:
- Table R402.1.1 provides insulation and fenestration requirements.
- Air barrier and thermal barrier requirements are outlined for exterior walls.
2015, 2018, and 2021 IECC:
- Insulation and fenestration requirements are detailed in Table R402.1.2.
- Air barrier and insulation installation requirements are defined, including testing for air leakage.
2009 International Residential Code (IRC):
- Table N1102.4.2 outlines criteria for air barriers and insulation in exterior framed walls.
- Specific requirements for insulation, air barriers, and testing are specified in different code sections based on the year of the code edition.
2012 IRC:
- Table N1102.4.1.1 provides requirements for insulation in exterior framed walls.
- Air barrier and thermal barrier requirements are outlined, including sealing and materials.
2015, 2018, and 2021 IRC:
- Air barrier and insulation installation requirements are defined in N1102.4.1.1.
- General requirements for air barriers, sealing, and materials are specified.
Retrofit Requirements:
- Retrofit requirements are detailed for various code editions (2009, 2012, 2015, 2018, and 2021 IECC and IRC).
- Specific sections and provisions for additions, alterations, renovations, and repairs are outlined.
For immediate service or consultation, you may contact us at Allied Emergency Services, INC.
Contact Information:
- Phone: 1-800-792-0212
- Email: Info@AlliedEmergencyServices.com
- Location: Serving Illinois, Wisconsin, and Indiana with a focus on the greater Chicago area.
If you require immediate assistance or have specific questions, our human support is readily available to help you.
Disclaimer: This article is intended for informational purposes only. For professional advice, consult experts in the field.
⚡ Need Storm Damage Help? We Serve 155+ Cities
Allied Emergency Services provides 24/7 emergency restoration across Illinois, Wisconsin, Indiana, and Michigan. Text ESTIMATE to (844) 907-2546 for a free estimate in minutes.
Top service areas: Chicago • Naperville • Aurora • Kankakee • Joliet • Rockford • Schaumburg • Milwaukee • Madison • We’re Hiring!
⚡ Storm or Roof Damage? Get a FREE Estimate
Text ESTIMATE to (844) 907-2546
Or call (800) 792-0212 for 24/7 emergency response
AI-powered • No obligation • Licensed IL & WI
Need storm restoration and roofing help?
Allied Emergency Services — Licensed IL & WI Storm Restoration And Roofing Specialists
For 27 years, Allied has been serving Illinois and Wisconsin homeowners with storm restoration and roofing across Illinois and Wisconsin. IICRC-certified, EPA Lead-Safe, IL Licensed Roofing Contractor #104.019029. 24/7 emergency response.
Learn about our Storm Restoration And Roofing service →Free property assessment within 24 hours · No obligation · Insurance claim support