⚡ Storm or Roof Damage? Get a FREE Estimate
Text ESTIMATE to (844) 907-2546
Or call (800) 792-0212 for 24/7 emergency response
AI-powered • No obligation • Licensed IL & WI
Rough carpentry plays a crucial role in the construction process, providing structural support and stability to buildings. When it comes to installing engineered wood panels, following specific guidelines is essential to ensure the panels’ longevity and performance. This article outlines the general provisions and installation requirements for roof sheathing, wall sheathing, and subflooring in rough carpentry, according to CSI Division 6 standards.
General Provisions
- Identification Requirements: Each panel must be clearly identified with the appropriate trademark of the APA – The Engineered Wood Association. Additionally, it should meet the requirements of the latest edition of U.S. Product Standard PS 1 or APA PRP-108 Performance Standards.
- Weather Exposure: All panels that have any edge or surface permanently exposed to the weather must be classified as Exterior panels.
- Thickness, Grade, and Group Number: The panel thickness, grade, and Group number or Span Rating should be at least equal to the specifications shown on the drawings. The application should follow the recommendations provided by the APA – The Engineered Wood Association.
Roof Sheathing
Panel Selection:
Panel roof sheathing should be chosen from the following appropriate grades: APA RATED SHEATHING EXP 1 or 2, APA RATED SHEATHING EXT, APA STRUCTURAL I RATED SHEATHING EXP 1, APA STRUCTURAL I RATED SHEATHING EXT. Exterior sheathing must be used for panels permanently exposed to weather conditions.
Installation Guidelines:
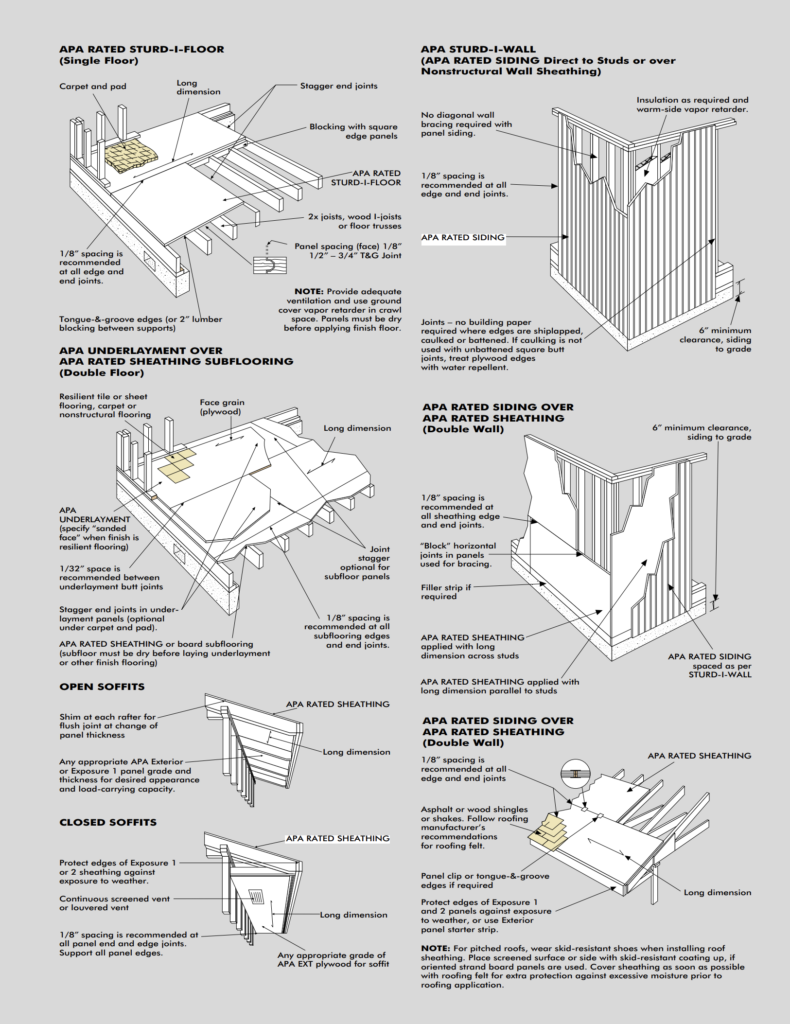
- Install the panel with its long dimension or strength axis across the supports, unless otherwise noted.
- For pitched roofs, wear skid-resistant shoes during installation.
- If oriented strand board (OSB) panels are used, place the screened surface or side with skid-resistant coating facing up.
- Provide suitable edge support as indicated on the drawings or in the APA’s recommendations using panel clips, tongue-and-groove edges, or lumber blocking between joists.
- Panel end joints should align with framing members.
- Maintain a recommended spacing of 1/8 inch at panel ends and edges, unless otherwise specified by the panel manufacturer.
- Nail the panel 6 inches on center (o.c.) along supported panel edges and 12 inches o.c. at intermediate supports. If the supports are spaced 48 inches o.c. or more, nail 6 inches o.c. at all supports. Use 6d common nails for panels 1/2 inch and thinner, 8d nails for greater thicknesses, and 8d ring-shank or 10d common nails for 1-1/8-inch panels.
- Cover the roof sheathing promptly with roofing felt or shingle underlayment for protection against excessive moisture before applying the roofing material.
Wall Sheathing
Panel Selection:
Choose the appropriate grade for panel wall sheathing from the following options: APA RATED SHEATHING EXP 1 or 2, APA RATED SHEATHING EXT, APA STRUCTURAL I RATED SHEATHING EXP 1, APA STRUCTURAL I RATED SHEATHING EXT. Exterior sheathing should be used for panels permanently exposed to weather conditions.
Installation Guidelines:
- Install the panel with its long dimension or strength axis across the supports, unless otherwise noted.
- Provide suitable edge support as indicated on the drawings or in the APA’s recommendations using panel clips, tongue-and-groove edges, or lumber blocking between studs.
- Panel end joints should align with framing members.
- Maintain a recommended spacing of 1/8 inch at panel ends and edges, unless otherwise specified by the panel manufacturer.
- Nail the panel 6 inches o.c. along supported panel edges and 12 inches o.c. at intermediate supports. If the supports are spaced 48 inches o.c. or more, nail 6 inches o.c. at all supports. Use 6d common nails for panels 1/2 inch and thinner, 8d nails for greater thicknesses, and 8d ring-shank or 10d common nails for 1-1/8-inch panels.
- Cover the wall sheathing promptly with a weather-resistant barrier or building paper to protect against moisture before installing the siding.
Subflooring
Panel Selection:
Choose the appropriate grade for panel subflooring from the following options: APA RATED STURD-I-FLOOR, APA RATED STURD-I-FLOOR EXP, APA RATED STURD-I-FLOOR EXT.
Installation Guidelines
- Install the panel with its long dimension or strength axis across the supports, unless otherwise noted.
- Panel end joints should align with framing members.
- Maintain a recommended spacing of 1/8 inch at panel ends and edges, unless otherwise specified by the panel manufacturer.
- Nail the panel 6 inches o.c. along supported panel edges and 12 inches o.c. at intermediate supports. If the supports are spaced 48 inches o.c. or more, nail 6 inches o.c. at all supports. Use 6d common nails for panels 1/2 inch and thinner, 8d nails for greater thicknesses, and 8d ring-shank or 10d common nails for 1-1/8-inch panels.
- Cover the subflooring promptly with a suitable underlayment or floor covering to protect against moisture before the final flooring installation.
General Installation Requirements:
- Handling, Storage, and Installation: Follow the recommendations provided by the APA – The Engineered Wood Association for the handling, storage, and installation of APA Performance Rated Panels.
- Panel Support and Fastening: Ensure that all panels are properly supported by framing members or blocking at all edges and intermediate supports. Fasten the panels according to the guidelines specified in this section, as recommended by the APA – The Engineered Wood Association and in compliance with building code requirements.
- Panel Alignment: Make sure that the edges and ends of the panels align with framing members unless otherwise indicated by the panel manufacturer or approved by the engineer.
- Manufacturer’s Recommendations: Do not exceed the panel manufacturer’s recommended spans, loads, and construction practices for the specific application.
- Moisture Protection: Protect the panels from excessive moisture and ensure proper moisture management during the installation process. Promptly cover the panels with appropriate materials such as roofing felt, shingle underlayment, weather-resistant barrier, or building paper to safeguard against moisture damage.
METHOD OF ORDERING: APA PERFORMANCE RATED PANELS
When ordering APA Performance Rated Panels, it is essential to follow specific guidelines to ensure accurate and efficient procurement. The following method outlines how to place an order for various types of APA panels:
APA RATED SHEATHING:
Specify the thickness, APA trademark, grade, Span Rating, exposure durability classification, dimensions, and the number of pieces required. For example:
- 15/32″ APA RATED SHEATHING 32/16, Exposure 1, 48″ x 96″, 100 pcs.
- 23/32″ APA RATED STURD-I-FLOOR 24 oc, Exterior, 48″ x 96″, 100 pcs. (Note: Indicate “square edge” or “tongue-and-groove” as desired.)
APA RATED SIDINGS:
Designate the thickness, APA trademark, face grade (for APA Rated Siding-303), Span Rating, texture, pattern, dimensions, and the number of pieces. For example:
- 19/32″ APA RATED SIDING, 303-18-W, 16 oc, rough-sawn Texture 1-11, grooves 4″ oc, 48″ x 96″, 100 pcs. (Note: Include the manufacturer’s trade name if desired.)
APA SANDED AND TOUCH-SANDED PANELS:
Specify the thickness, APA trademark, grade, Group number, exposure durability classification, dimensions, and the number of pieces. For example:
- 3/8″ APA A-A, Group 1, Exterior, 48″ x 96″, 100 pcs.
- 3/8″ APA Underlayment, Group 1, Exposure 1, 48″ x 96″, 100 pcs. (Note: Indicate “sanded face” if used under resilient flooring or refer to pages 13-14 for additional grades.)
CONCRETE FORM:
Designate the thickness, APA trademark, Class, dimensions, and the number of pieces. For example:
- 5/8″ APA B-B PLYFORM Class I, 48″ x 96″, 100 pcs. (Note: B-B Plyform panels are manufactured as Exterior panels and are typically mill-oiled unless otherwise specified.)
OVERLAID PANELS:
Specify the thickness, APA trademark, grade, Group number, dimensions, and the number of pieces. For example:
- 1/2″ APA MEDIUM DENSITY OVERLAY (MDO) or (APA 303-0L MDO for overlaid panels produced under the APA RATED SIDING-303 specification), Group 1, 48″ x 96″, 100 pcs. (Note: Any special requirements, such as one side overlaid or specific surface texture or weight of surfacing material, should be clearly stated after the standard specification.)
Note:
- Most tongue-and-groove panels have a net face width of 47-1/2 inches, although it may vary depending on manufacturing practices. It is advisable to check with your supplier for exact measurements.
- Underlayment and C-C Plugged panels that are 1/2″ and thicker are span rated and do not include a species group number in the trademark. Please designate the Span Rating accordingly.
By following this method of ordering, you can ensure accurate communication and acquire the appropriate APA Performance Rated Panels for your construction needs.
Storage and Handling
Proper storage and handling of APA trademarked structural wood panels are crucial to ensure their long-term performance. Follow these guidelines to protect the panels and maintain their quality:
- Edge and End Protection: Pay special attention to tongue-and-groove floor and shiplapped siding panels. Safeguard the edges and ends of the panels to prevent damage.
- Forklift Handling: When using a forklift to move panels, place them on pallets or bunks to avoid damage from fork tines.
- Transportation: If panels need to be transported on open truckbeds, cover them with standard tarpaulins for protection. For open railcar shipment, utilize “lumber wrap” to prevent prolonged exposure to weather conditions.
- Indoor Storage: Whenever possible, store panels under a roof, especially if they will not be used immediately after receipt. Keep sanded and appearance grades away from open doorways. To prevent warping due to humidity, place a weight on top of the stack, ensuring the top panel is secured.
- Moisture Absorption: If moisture absorption is expected, cut steel banding on panel bundles to prevent edge damage.
- Outdoor Storage: If panels need to be stored outside, stack them on a level platform supported by 4×4 stringers or blocking. Avoid direct contact with the ground. Use at least three full-width supports along the eight-foot length of the panel, with one centered and the others 12 to 16 inches from each end.
- Stack Covering: Loosely cover the stack with plastic sheets or tarps. Anchor the covering at the top of the stack, but keep it open and away from the sides and bottom to allow for proper ventilation. Tight coverings restrict air circulation and can create a “greenhouse” effect when exposed to sunlight, leading to mold formation.
By following these storage and handling guidelines, you can protect APA trademarked structural wood panels from damage and maintain their quality until they are ready for installation.
Adhering to the guidelines for rough carpentry and following the specified installation requirements for engineered wood panels is crucial for ensuring the structural integrity and longevity of a building. By complying with these provisions, contractors and builders can create robust and reliable structures that meet industry standards and ensure occupant safety.
Call us at 1-800-792-0212 or visit our website www.alliedemergencyservices.com to get in touch with our team. We’re here to answer any questions you may have and discuss your carpentry needs.
#carpentry #woodworking #customcarpentry #residentialcarpentry #commercialcarpentry #carpentryservices #carpentrycontractor #woodworkdesign #homedecor #interiordesign #renovation #homeimprovement
⚡ Need Storm Damage Help? We Serve 155+ Cities
Allied Emergency Services provides 24/7 emergency restoration across Illinois, Wisconsin, Indiana, and Michigan. Text ESTIMATE to (844) 907-2546 for a free estimate in minutes.
Top service areas: Chicago • Naperville • Aurora • Kankakee • Joliet • Rockford • Schaumburg • Milwaukee • Madison • We’re Hiring!
⚡ Storm or Roof Damage? Get a FREE Estimate
Text ESTIMATE to (844) 907-2546
Or call (800) 792-0212 for 24/7 emergency response
AI-powered • No obligation • Licensed IL & WI
Need storm restoration and roofing help?
Allied Emergency Services — Licensed IL & WI Storm Restoration And Roofing Specialists
For 27 years, Allied has been serving Illinois and Wisconsin homeowners with storm restoration and roofing across Illinois and Wisconsin. IICRC-certified, EPA Lead-Safe, IL Licensed Roofing Contractor #104.019029. 24/7 emergency response.
Learn about our Storm Restoration And Roofing service →Free property assessment within 24 hours · No obligation · Insurance claim support