⚡ Storm or Roof Damage? Get a FREE Estimate
Text ESTIMATE to (844) 907-2546
Or call (800) 792-0212 for 24/7 emergency response
AI-powered • No obligation • Licensed IL & WI
Introduction: Soffits, also known as dropped ceilings, play a crucial role in the aesthetics and functionality of your home. Often found above kitchen cabinets or as duct and piping chases along hallways, they can also be sources of energy loss and discomfort. In this blog, we’ll explore the importance of air sealing and insulating soffits in unconditioned attics, turning them into valuable components of your whole-house draft barrier. By addressing this often-overlooked area, you can improve energy efficiency and indoor comfort while reducing your energy bills.
Technical Description: A whole-house draft barrier is a continuous layer of air-tight materials that block air leaks. This barrier can also serve as a water barrier, thermal barrier, and vapor barrier. To achieve a fully aligned air barrier, consider the following steps:
- Select the Right Materials: Choose rigid foam insulation, drywall, plywood, or OSB as your air barrier material.
- Flush Installation: Install the air barrier flush with the surrounding ceiling.
- Seal Seams and Gaps: Thoroughly seal all seams, gaps, and holes in the air barrier with caulk or foam before adding attic insulation.
- Continuous Contact: Ensure that the air barrier maintains continuous contact with the insulation.
- Exterior Wall Considerations: If the soffit runs along an exterior wall, install an air barrier on the interior side of the exterior wall insulation before covering the soffit.
How to Air Seal a Soffit or Dropped Ceiling: For Ducts in an Interior Hallway
- Install hallway framing for the sides of the soffit but not the bottom.
- Install the air barrier for the ceiling and side walls of the soffit on the inside of the framing, using materials like gypsum board, OSB, plywood, or rigid foam.
- Install ducts and framing for the bottom of the soffit.
- Finish by caulking and fastening ceiling drywall for the bottom of the soffit.
- Install drywall on hallway walls and caulk, mud, and tape to seal seams at the lower corners of the soffit.
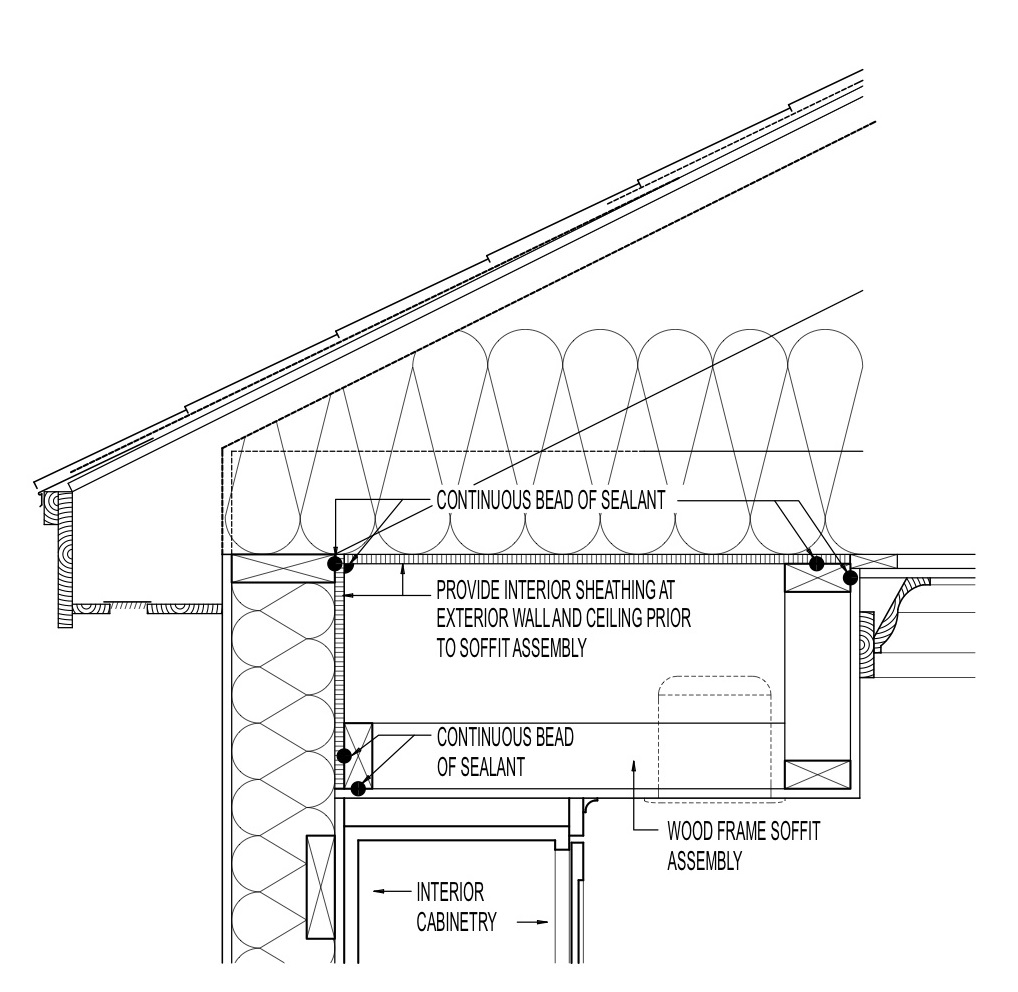
For Soffits on an Exterior Wall:
- Install cavity insulation in the exterior wall up to the top plate.
- Run a continuous bead of caulk along the top plate and install drywall or other air barrier material on the wall and ceiling.
- Caulk the seam where the wall and ceiling air barrier meet.
- Install framing for the soffit and seal it to the ceiling and wall air barrier material with caulk.
- Finish by installing the soffit drywall, caulking, mud, taping, and installing trim and cabinets if necessary.
- In the attic, add insulation over the soffit as you would for the rest of the attic floor.
For Soffits with Recessed Can Lights:
- If on an exterior wall, cover the exterior wall behind the soffit with an air barrier material first.
- Attach drywall to the side(s) and bottom of the soffit with caulk and fasteners.
- Caulk, mud, and tape the drywall at the seams to air seal it.
- Install can lights but do not fill the soffit with insulation; insulation will be installed above the soffit.
- Cut air barrier material to fit between joist bays on the attic side of the ceiling. Notch for wiring if necessary.
- Fasten the air barrier material in place over the soffit with caulk and caulk edges, as well as around wiring. Cover with attic insulation.
How To Retrofit an Existing Dropped Ceiling or Soffit
How to Air Seal and Insulate a Dropped Ceiling or Soffit
- Identify soffit and dropped ceiling locations inside the home.
- Inspect ceilings, attics, and roofs for issues like leaks, mold, rot, wiring, and asbestos. Address any problems before proceeding.
- Temporarily remove attic insulation to expose the open cavity of the dropped soffit.
- If the soffit is along an exterior wall, ensure exterior wall insulation is covered with a solid air barrier. If not, cut and install a barrier, then proceed with air sealing the soffit top.
- Cut plywood, OSB, drywall, or rigid insulation to fit between the framing that defines the soffit.
- Apply caulk to the framing’s top and side surfaces.
- Place the solid material over the soffit opening, securing it with sealant, nails, or screws.
- Seal the edges of the closure with sealant and use sheathing tape or sealant for joints. Caulk or foam around any penetrations.
- Add insulation over the rigid barrier to match adjacent attic insulation.
- Check and adjust attic insulation to meet code requirements.
- Note that insulation inside the soffit isn’t necessary; it should be above the closure. Remove insulation if non-ICAT rated recessed lights are present.
Ensuring Success: To verify the effectiveness of your soffit air sealing, consider conducting blower door testing as part of whole-house energy performance testing. This test can help identify any remaining air leakage issues. Additionally, it may be helpful to use an infrared camera to detect air leakage if there is a noticeable temperature difference between the attic and the conditioned space of your home.
Climate Considerations: Ensure that your insulation levels meet or exceed code requirements for your climate zone. Refer to the relevant energy codes to determine the specific insulation requirements for your area.
Compliance with Codes and Standards
ENERGY STAR Single-Family New Homes, Version 3/3.1 (Rev. 11):
- ENERGY STAR Reference Design Home determines ERI Target.
- Version 3.0 – Exhibit 1: Infiltration rates modeled as follows:
- 6 ACH50 in CZs 1,2
- 5 ACH50 in CZs 3,4
- 4 ACH50 in CZs 5,6,7
- 3 ACH50 in CZ 8
- Version 3.1 – Exhibit 1: Infiltration rates modeled as follows:
- 4 ACH50 in CZs 1,2
- 3 ACH50 in CZs 3,4,5,6,7,8
National Rater Field Checklist – Thermal Enclosure System:
- Fully-Aligned Air Barriers provided.
- Ceiling insulation alignment based on climate zones.
- Dropped ceilings/soffits and other ceilings considered.
DOE Zero Energy Ready Home (Revision 07):
- Mandatory Requirements:
- Certified under ENERGY STAR Qualified Homes Program or ENERGY STAR Multifamily New Construction Program.
- Ceiling, wall, floor, and slab insulation meets/exceeds 2015 IECC levels, achieving Grade 1 installation per RESNET standards.
- Insulation and Infiltration Requirements (Exhibit 2):
- Insulation levels meet 2012 (or 2015) IECC, Grade 1 installation.
- Whole house leakage limits based on zones.
2009-2021 IECC and IRC Insulation Requirements Table: Specifies minimum insulation requirements for ceilings, walls, floors, and foundations in new homes.
2009 International Energy Conservation Code (IECC):
- Table R402.1.1: Lists insulation and fenestration requirements.
- Table 402.4.2: Air barrier and insulation inspection criteria.
- Section R402.4.2: Air sealing and insulation testing criteria.
2012 IECC:
- Table R402.1.1: Insulation and fenestration requirements.
- Table R402.4.1.1: Air barrier and insulation installation.
- Section R402.4.1.2: Air leakage testing criteria.
2015, 2018, and 2021 IECC:
- Table R402.1.2: Insulation and fenestration requirements.
- Table R402.4.1.1: Air barrier and insulation installation.
- Section R402.4.1.2: Air leakage testing criteria.
2009 International Residential Code (IRC):
- Table N1102.4.2: Air barrier and insulation inspection criteria.
2012 IRC:
- N1102.4.1.1: Air barrier and insulation installation.
2015, 2018, and 2021 IRC:
- N1102.4.1.1: Air barrier and insulation installation.
Air Barrier Association of America (ABAA) Standards:
- ABAA 07261: Self-Adhered Sheet Air Barrier (2006).
- ABAA 07263: Closed Cell, Medium-Density Spray Polyurethane Foam Air Barrier (2011).
Conclusion: Don’t underestimate the impact of soffits on your home’s energy efficiency. By properly air sealing and insulating soffits, you can enhance your whole-house draft barrier, save on energy costs, and create a more comfortable living environment. This often-overlooked step in home improvement can make a significant difference in your overall energy performance.
For immediate service or consultation, you may contact us at Allied Emergency Services, INC.
Contact Information:
- Phone: 1-800-792-0212
- Email: Info@AlliedEmergencyServices.com
- Location: Serving Illinois, Wisconsin, and Indiana with a focus on the greater Chicago area.
If you require immediate assistance or have specific questions, our human support is readily available to help you.
Disclaimer: This article is intended for informational purposes only. For professional advice, consult experts in the field.
⚡ Need Storm Damage Help? We Serve 155+ Cities
Allied Emergency Services provides 24/7 emergency restoration across Illinois, Wisconsin, Indiana, and Michigan. Text ESTIMATE to (844) 907-2546 for a free estimate in minutes.
Top service areas: Chicago • Naperville • Aurora • Kankakee • Joliet • Rockford • Schaumburg • Milwaukee • Madison • We’re Hiring!
⚡ Storm or Roof Damage? Get a FREE Estimate
Text ESTIMATE to (844) 907-2546
Or call (800) 792-0212 for 24/7 emergency response
AI-powered • No obligation • Licensed IL & WI
Need storm restoration and roofing help?
Allied Emergency Services — Licensed IL & WI Storm Restoration And Roofing Specialists
For 27 years, Allied has been serving Illinois and Wisconsin homeowners with storm restoration and roofing across Illinois and Wisconsin. IICRC-certified, EPA Lead-Safe, IL Licensed Roofing Contractor #104.019029. 24/7 emergency response.
Learn about our Storm Restoration And Roofing service →Free property assessment within 24 hours · No obligation · Insurance claim support