⚡ Storm or Roof Damage? Get a FREE Estimate
Text ESTIMATE to (844) 907-2546
Or call (800) 792-0212 for 24/7 emergency response
AI-powered • No obligation • Licensed IL & WI
When restoring or repairing buildings after storm damage, ensuring the structure’s envelope is effectively protected against water and air penetration is crucial. DuPont Tyvek provides a range of water-resistive barriers (WRBs) designed to enhance the durability and energy efficiency of buildings. Here’s a quick guide on how to properly install DuPont Tyvek WRBs for residential buildings up to 5 stories and low-rise multi-family buildings up to 6 stories.
Product Selection
- HomeWrap®, StuccoWrap®, DrainWrap™, ThermaWrap™ LE, CommercialWrap®, and CommercialWrap® D cater to different needs, ensuring versatility across various applications.
- Flashing Products: FlexWrap™ EZ, StraightFlash™, and VersaFlange™ are designed for seamless integration with Tyvek® WRBs.
Product Selection and Codes
- DuPont™ Tyvek® HomeWrap®: Available in various dimensions, meeting needs for different project sizes. Relevant codes: ICC-ES Evaluation Report ESR 2375, ASTM E 2556 Type II.
- Flashing Products: Include DuPont™ FlexWrap™ EZ and DuPont™ Flashing Tape, essential for creating a seamless barrier. Codes for product standards include ASTM D 226 for Type 1 felt and ICC-ES AC38.
Installation Codes and Guidelines
- Water-Resistive Barrier (WRB) Code Requirements: Compliant with the 2015 International Residential Code (IRC) Section R703.1.1 and the 2015 International Building Code (IBC) Section 1403.2 for weather protection.
- General Installation Compliance: Installation practices adhere to ASTM E 2178 for air permeance of building materials, ensuring compliance with IECC-2015 Sections R402.4 and C402.4 for air leakage control.
2018 International Building Code (IBC) Requirements:
- IBC 1402.2 mandates a weather-resistant barrier (WRB) meeting water-resistance and vapor permeability standards for a house wrap used as a weather-resistant barrier (WRB).
- Exterior walls must provide the building with a weather-resistant exterior wall envelope, per IBC Chapter 14 requirements.
- Exceptions where a weather-resistant exterior wall envelope is not required:
- Concrete or masonry walls designed according to IBC chapters 19 and 21.
- Exterior Insulation and Finish Systems (EIFS) in compliance with IBC 1407.4.1.
- Exterior wall envelopes resisting wind-driven rain as per ASTM E331.
2018 International Residential Code (IRC) Requirements:
- IRC R703.1.1 mandates the design and construction of exterior walls to prevent water accumulation, requiring a water-resistant barrier behind exterior cladding.
- Approved water-resistive barrier must be applied over studs or sheathing of every exterior wall, according to manufacturer’s instructions, meeting the requirements of Section R703.1.
- Exceptions where a weather-resistant exterior wall envelope is not required:
- Masonry or concrete walls built in accordance with Chapter 6 and flashed as per Section R703.8 and R703.2.
- Exterior wall envelopes resisting wind-driven rain as per ASTM E331.
Installation Preparation
- Install after roof sheathing and flashings.
- Ensure windows and doors are not yet installed for best results.
- Tyvek® Self-Adhered Flashing Products are not suitable for through-wall applications.
Key Steps for Installation
- Wall Preparation: Remove existing siding if necessary and repair any wall damage.
- Align and Roll Out Tyvek® WRB: Start at the bottom, ensuring overlaps and proper sealing at edges.
- Secure WRB: Fasten to studs or nail-base material, maintaining recommended distances from window and door openings.
- Overlap and Tape Seams: Use Tyvek® Tape for vertical seams and DuPont™ Tyvek® Metalized Tape for Tyvek® ThermaWrap™ LE.
- Flash Windows and Doors: Follow DuPont™ Self-Adhered Flashing Systems Installation Guidelines for detailed procedures.
- Address Penetrations: Properly seal around any penetrations in the WRB for a continuous barrier.
- Final Checks for Continuity and Coverage: Ensure the entire building envelope is consistently wrapped and sealed.
Installation Instructions: A Step-by-Step Guide
- Start with Proper Wall Preparation:
- Remove existing siding and replace any damaged wall material.
- Ensure the wall surface is clean, dry, and free from contaminants that could hinder adhesion.
- Correctly Align and Unroll Tyvek® WRB:
- Begin at the structure’s bottom corner, ensuring the roll is plumb.
- Extend the bottom edge of the roll over the sill plate interface by at least 1” (2” or greater recommended).
- Secure Tyvek® WRB Properly:
- Fasten Tyvek® WRB to the stud or nail-base material, placing fasteners no closer than 6” and no farther than 18” on vertical stud lines.
- Use recommended fasteners like DuPont™ Tyvek® Wrap Cap nails, screws, or staples, ensuring adherence to the “Special Considerations” for equivalent fastener requirements.
- Ensure Proper Overlapping:
- Overlap all vertical seams by 6-12”.
- Tape all vertical seams with DuPont™ Tyvek® Tape for water-resistive barrier installations; use 3” Tyvek® Tape for horizontal seams of Tyvek® StuccoWrap® and Tyvek® DrainWrap™ for air barrier installations.
- Integration with Windows and Doors:
- Unroll directly over windows and doors, ensuring the upper layer of Tyvek® WRB overlaps the bottom layer by a minimum of 6”.
- Follow DuPont™ Self-Adhered Flashing Systems Installation Guidelines to prepare and flash window and door openings.
- Addressing Penetrations and Tears:
- Seal around all penetration points with appropriate DuPont™ Flashing Systems products or Tyvek® Tape.
- For minor tears, use Tyvek® Tape for repairs; larger holes may require patching with a piece of Tyvek® WRB.
Ensuring Continuity for Optimal Performance
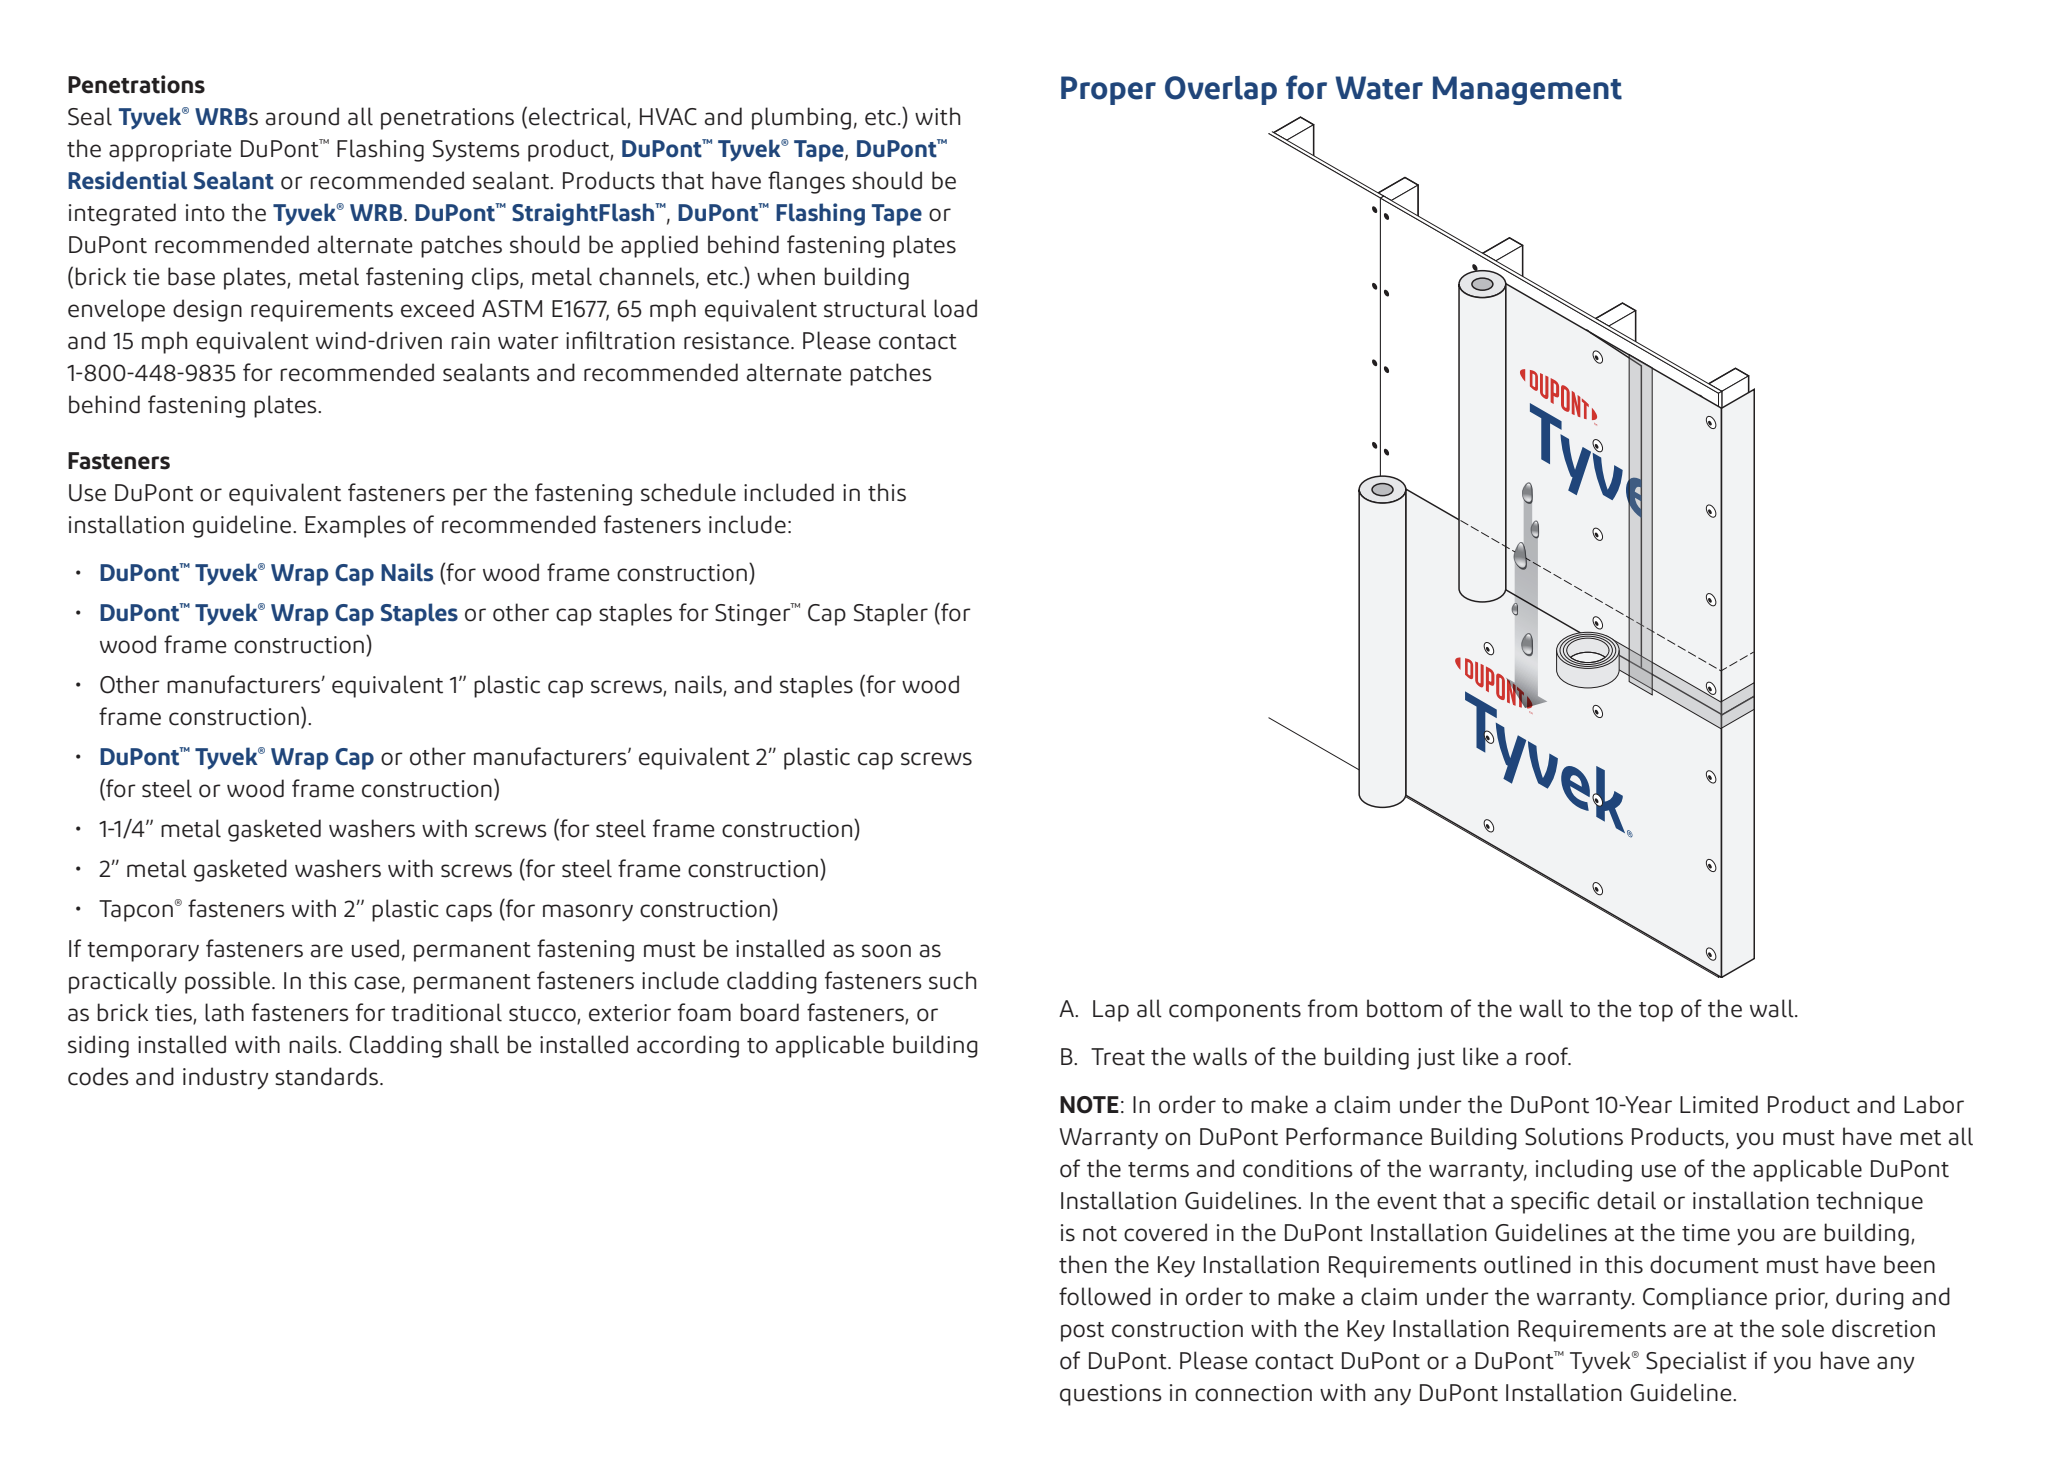
- Seamless Coverage: From the bottom of the structure, continue wrapping all the way up, overlapping the previous layer of Tyvek® WRB by a minimum of 6”. This ensures that water flows over the Tyvek® and not into the building envelope.
- Attention to Terminations: Properly lap Tyvek® WRB over all flashing and integrate weep screeds and expansion joints with flashings and the Tyvek® WRB to maintain the continuity of the water-resistive barrier.
- Gable Ends and Cantilever Floors: Cover completely, including a 6”-12” overlap at each corner for gable ends. For cantilever floors, wrap Tyvek® WRB under and up the cantilever wall a minimum of 6”, taping all corners.
Special Considerations
- Ensure drainage grooves in StuccoWrap™ and DrainWrap™ are vertical.
- Tyvek® ThermaWrap™ LE requires a clear air space for R-Value benefits but still acts as a barrier without it.
- The exterior sheathing must be clean and dry before application of self-adhered flashing products.
Facade Integration
- Different facade materials require specific considerations for optimal water-resistive performance. Whether you’re working with stucco, brick, stone veneer, or siding, ensure there’s an effective drainage space and that the WRB is properly integrated with flashings and terminations.
Effective Water Management Strategies
- Create a Continuous Drainage Plane: The entire installation must work cohesively to form a continuous drainage plane. This includes not just the overlaps but also how flashings, penetrations, and terminations are handled.
- Ensure Proper Ventilation: While focusing on water-resistive barriers, also ensure that the wall assembly can dry effectively. Proper ventilation and the use of breathable materials facilitate drying, reducing the risk of mold and water damage.
- Incorporate Drainage Enhancements: For areas with high exposure to rain or moisture, consider using Tyvek® StuccoWrap® or Tyvek® DrainWrap™, which offer enhanced drainage capabilities due to their textured surface.
- Monitor for Durability: Regular inspection and maintenance of the building envelope, including the Tyvek® WRB, can prevent future water intrusion issues, ensuring the structure’s longevity and durability.
Warranty Considerations
- Adherence to Installation Guidelines: For warranty claims under the DuPont 10-Year Limited Product and Labor Warranty, strict adherence to DuPont Installation Guidelines is essential. This includes all specified materials, overlap measurements, and sealing techniques.
- Documentation and Compliance: Keep detailed records of the installation process, materials used, and any deviations from standard practices. This documentation will be crucial if a warranty claim needs to be filed.
- Consultation with DuPont Specialists: When in doubt, consult a DuPont™ Tyvek® Specialist. Their expertise can provide clarity and ensure that your installation meets all required standards for warranty eligibility.
Conclusion
Based on the DuPont™ Tyvek® Water-Resistive and Air Barriers Installation Guidelines, there are several key reasons why spot repairs or partial siding repairs may not be compliant:
- Continuity and Overlap Requirements: The guidelines emphasize the importance of maintaining continuity of the DuPont™ Tyvek® Water-Resistive Barrier (WRB) from the bottom to the top with proper shingling. This is critical for ensuring that water is effectively shed away from the building envelope and does not penetrate the wall system. Spot or partial repairs that do not maintain this continuity and overlap might compromise the barrier’s effectiveness, leading to potential water intrusion issues .
- Integration with Flashings: Proper integration of the WRB with flashings around penetrations, windows, doors, and other areas is essential for a complete water-resistant system. The guidelines specify how various components, such as Tyvek® WRBs, flashings, and sealants, should be integrated to manage water effectively. Spot or partial repairs that fail to correctly integrate with existing flashings might not provide adequate protection against water intrusion .
- Handling Tears and Holes: The document outlines specific methods for addressing tears and holes in the WRB, including the use of Tyvek® Tape and DuPont Self-Adhered Flashing Products. For larger holes, a piece of Tyvek® WRB must be used to cover the hole, ensuring proper shingling. Improper repair of tears and holes, or failure to maintain the correct shingling and overlap during spot repairs, could lead to reduced effectiveness of the WRB in preventing water intrusion .
- Temporary Fastening: The guidelines discuss the use of temporary fastening methods and the necessity of applying permanent fastening as soon as practically possible to maintain the integrity and performance of the Tyvek® WRB. Reliance on temporary fasteners without timely follow-up with permanent fastening may compromise the WRB’s performance, especially in spot or partial repairs where existing fastening patterns may be disrupted .
In summary, for repairs to be compliant, they must maintain the WRB system’s integrity, including proper overlap, integration with flashings, handling of repairs, and transition to permanent fastening. Spot or partial repairs that do not adhere to these guidelines risk compromising the building envelope’s effectiveness in managing water, thereby potentially voiding warranty claims and leading to water damage issues.
In storm damage restoration, the goal is not just to repair but to fortify against future weather events. Proper overlap and water management in the installation of DuPont™ Tyvek® WRBs are central to achieving this goal. By following these guidelines, Allied Emergency Services, INC can ensure their projects not only meet the immediate needs of their clients but also provide lasting protection and peace of mind. Compliance with DuPont’s stringent installation requirements is not only a route to warranty coverage but a commitment to excellence and durability in building practices.
For immediate service or consultation, you may contact us at Allied Emergency Services, INC.
Contact Information:
- Phone: 1-800-792-0212
- Email: Info@AlliedEmergencyServices.com
- Location: Serving Illinois, Wisconsin, and Indiana with a focus on the greater Chicago area.
If you require immediate assistance or have specific questions, our human support is readily available to help you.
Disclaimer: This article is intended for informational purposes only. For professional advice, consult experts in the field.
⚡ Need Storm Damage Help? We Serve 155+ Cities
Allied Emergency Services provides 24/7 emergency restoration across Illinois, Wisconsin, Indiana, and Michigan. Text ESTIMATE to (844) 907-2546 for a free estimate in minutes.
Top service areas: Chicago • Naperville • Aurora • Kankakee • Joliet • Rockford • Schaumburg • Milwaukee • Madison • We’re Hiring!
⚡ Storm or Roof Damage? Get a FREE Estimate
Text ESTIMATE to (844) 907-2546
Or call (800) 792-0212 for 24/7 emergency response
AI-powered • No obligation • Licensed IL & WI
Need siding help?
Allied Emergency Services — Licensed IL & WI Siding Specialists
For 27 years, Allied has been installing and restoring siding across Illinois and Wisconsin. IICRC-certified, EPA Lead-Safe, IL Licensed Roofing Contractor #104.019029. 24/7 emergency response.
Learn about our Siding service →Free property assessment within 24 hours · No obligation · Insurance claim support