⚡ Storm or Roof Damage? Get a FREE Estimate
Text ESTIMATE to (844) 907-2546
Or call (800) 792-0212 for 24/7 emergency response
AI-powered • No obligation • Licensed IL & WI
The Glazing industry has witnessed a groundbreaking innovation – the CRL DRX™ Modular Door Rail System. This revolutionary dry-glaze door rail solution is designed to provide maximum flexibility and customization with minimal lead times. Let’s delve into the features, benefits, and installation of this game-changing system.
Maximum Flexibility and Customization
The DRX™ Modular Door Rail System deconstructs a standard door rail, offering unprecedented control over when, where, and how door rails are installed. It comprises two individual DRX™ door rail bodies that can be securely attached to the glass panel, regardless of its length. Side covers and end caps can be easily added during or after door installation, providing unmatched versatility.
Components & Installation
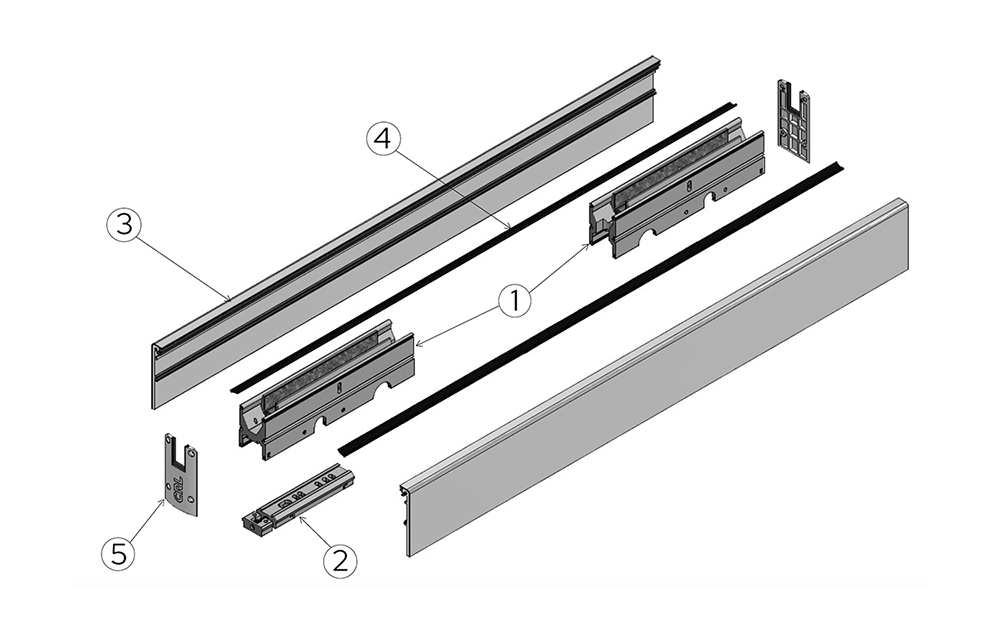
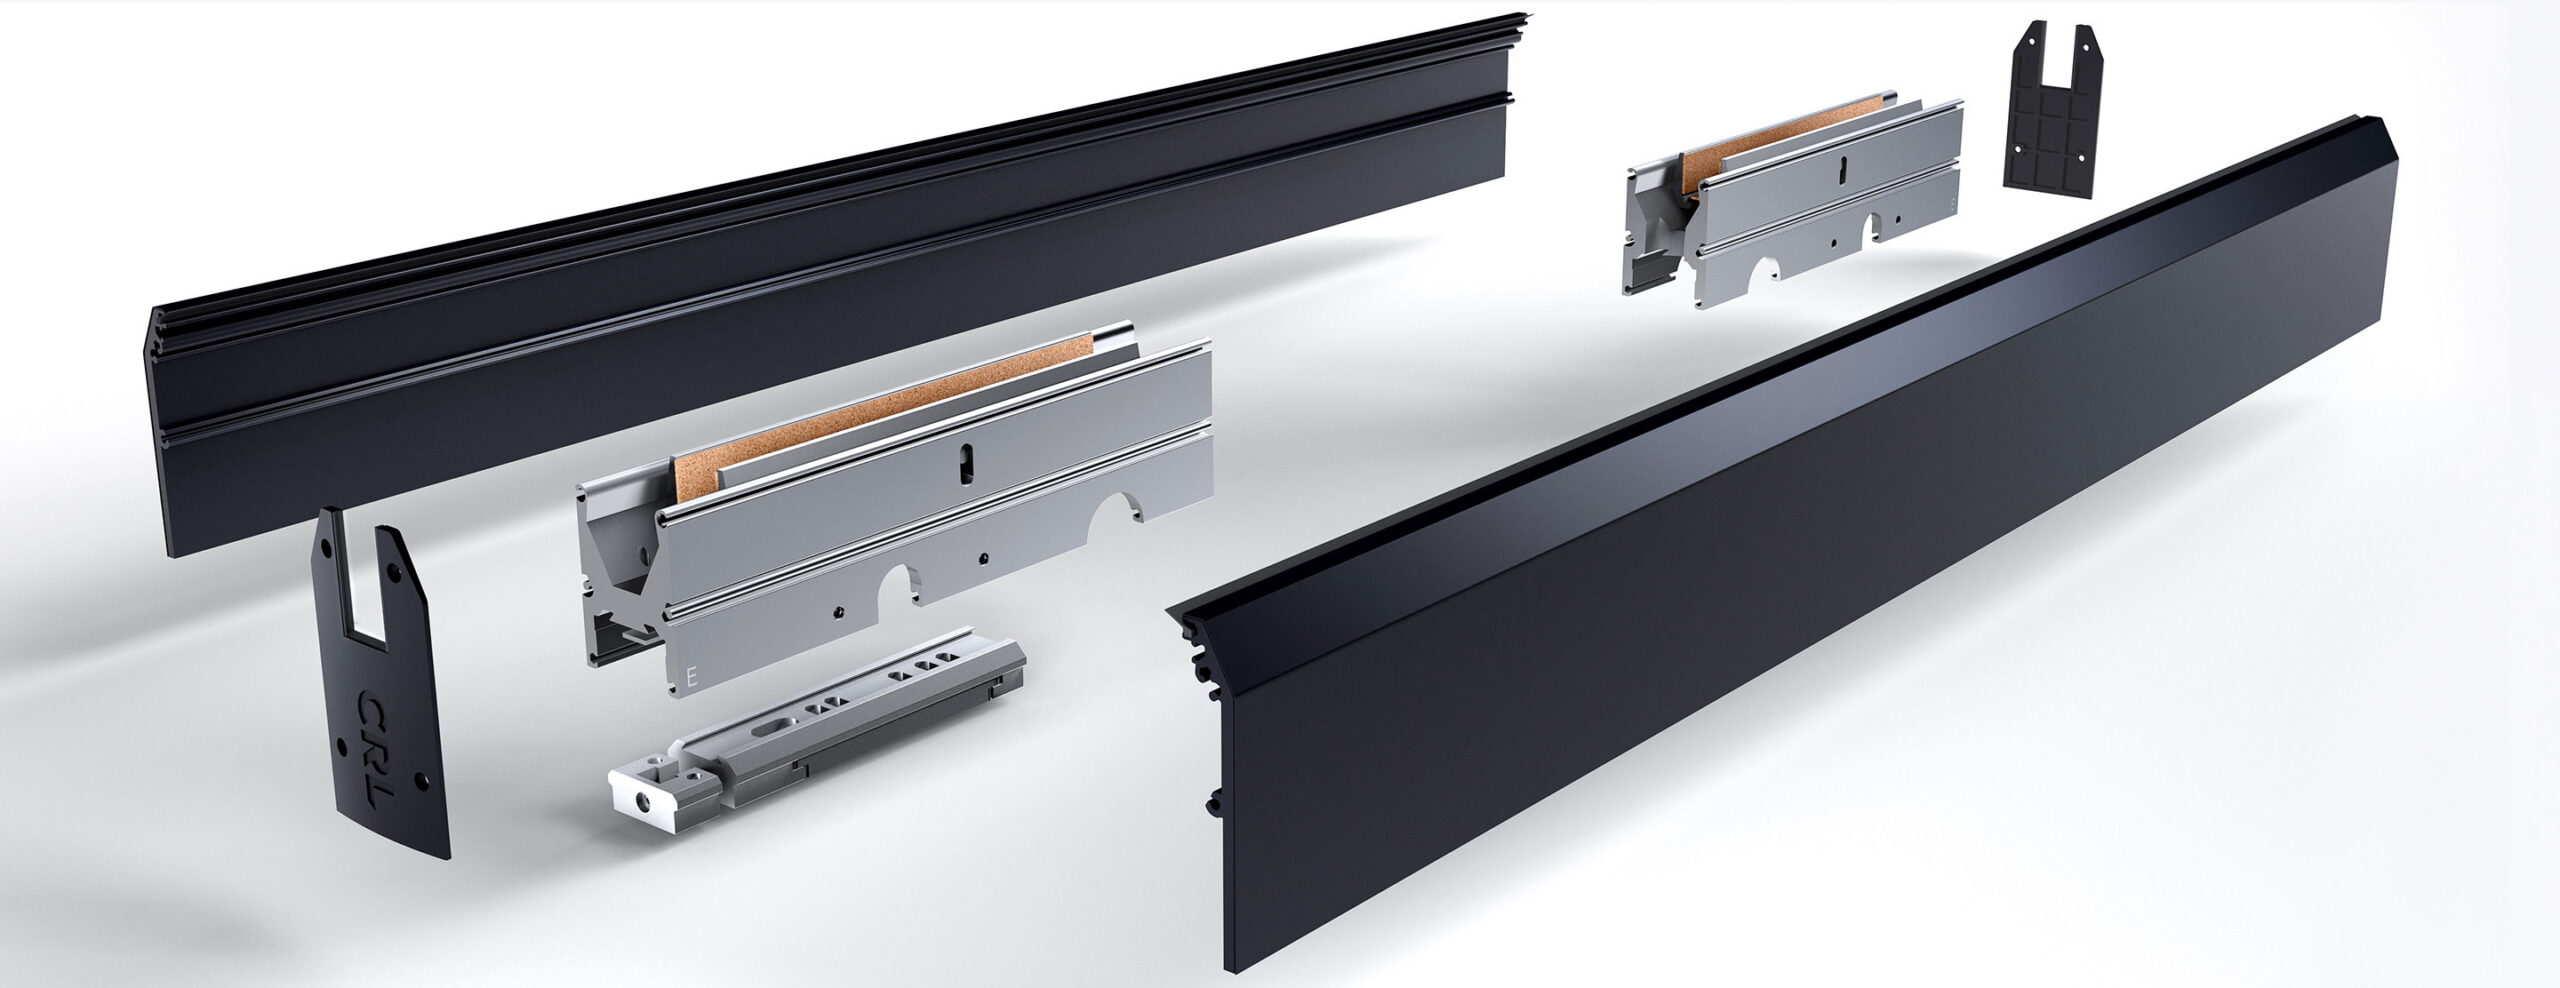
The system uses independent component parts, allowing flexibility when ordering and installing door rails. Door rail bodies can be moved along the glass to accommodate both standard and custom lengths. The key components include:
- 1-Door Rail Bodies (10-1/2″ wide)
- 2-Adjustable Slide Block
- 3-Side Covers (cut to length)
- 4-Gaskets
- 5-End Caps
Features & Benefits
The modular approach of the DRX™ system offers numerous advantages to glass temperers and glazing installers:
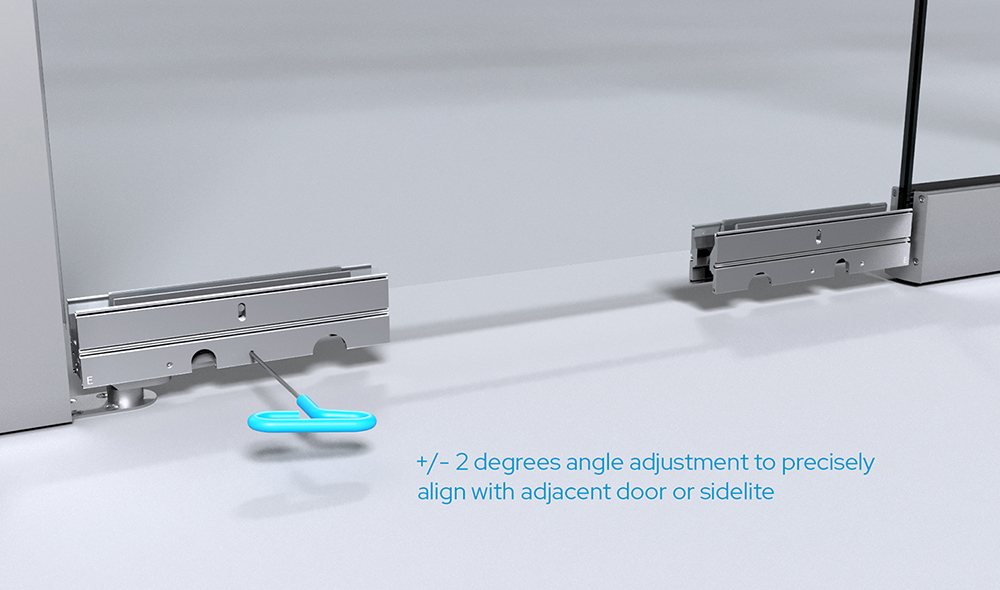
- +/- 2 degrees of angle adjustment for precise alignment
- Rail bodies come prepped for floor locks and Blumcraft® panic handles
- 3/16″ (5 mm) of side-to-side adjustment in either direction
- Side Covers can be slid on and off without removing the door from the pivot
Performance & Specs
The DRX™ Modular Door Rail System boasts impressive performance and specifications:
- Proprietary Jaw-Lock mechanism for superior glass clamping strength, withstands pull force test of up to 1300 pounds
- Tested to 500,000 cycles
- Durable aluminum 6061-T6 construction
- Compatible with floor locks and Blumcraft® panic handles
- Suitable for 3/8″ to 3/4″ monolithic or laminated tempered glass
- Available in various finishes, including Satin Anodized, Black Bronze Anodized, and more
Installation Instructions
The installation of the CRL DRX™ Modular Door Rail System is straightforward and efficient. It allows for the installation of a fully operational all-glass door during construction without making final decisions on door rail height and finish. This approach minimizes potential damage during construction and reduces waiting times for door rail deliveries.
COMPONENT PARTS
- Rail Bodies
- Rail Bodies are prepped for locking mechanism or panic device installation.
- Adjustable Slide Block and Door Rail Gaskets
- Adjustable Slide Block (DRX6K)
- Door Rail Gaskets (DRXG)
- Side Covers and End Caps
- Standard and custom finishes are available for Side Covers.
- Options include Blank 4” Side Cover (Square or Tapered), Side Cover with prep for CRL 777S Door Rail Lock (Square or Tapered), and Side Cover with Blumcraft® Panic/Egress/Deadbolt device (Square or Tapered).
DRX RAIL BODY INSTALLATION
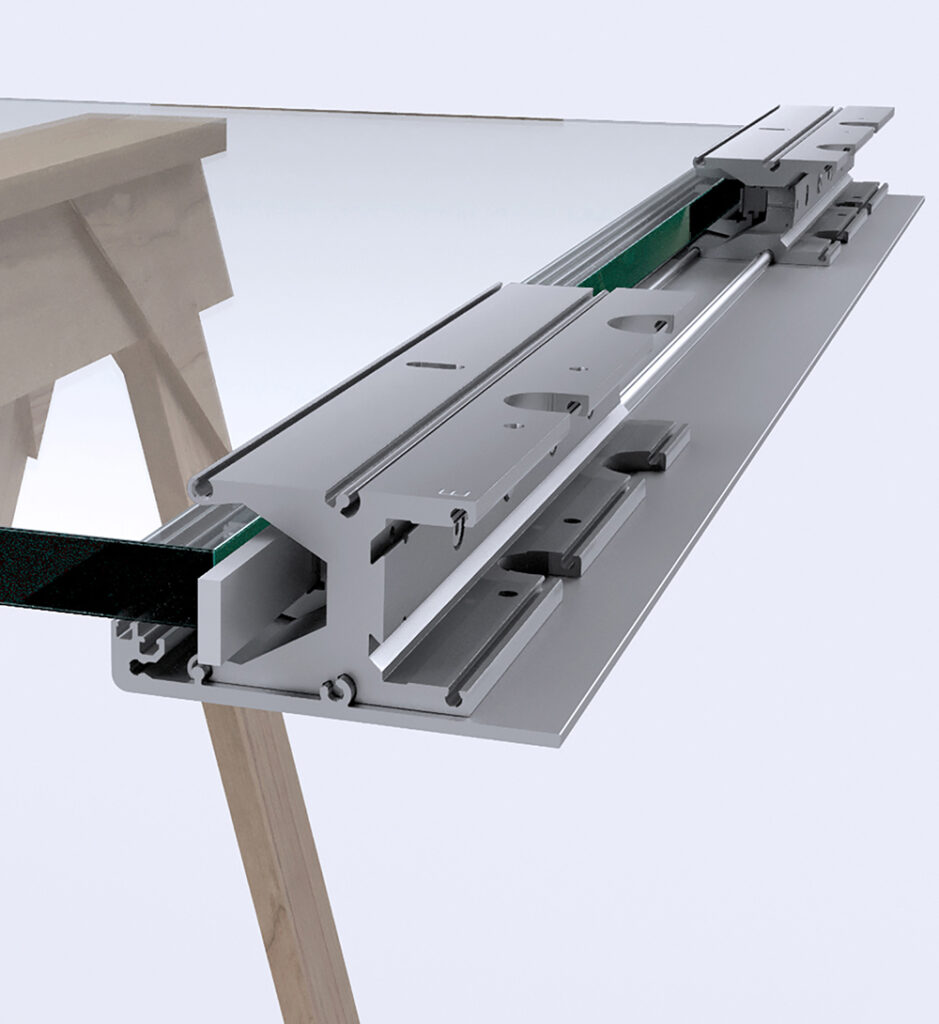
- Lay your glass panel flat on two sawhorses or another support structure.
- Place one Side Cover on a flat surface and slide two Rail Bodies into position to ensure proper alignment.
- Each Rail Body is marked with an “E.” Ensure the “E” on the pivot side Rail Body faces out towards the glass edge.
- Slip Rail Bodies with Side Cover onto the glass.
- Position each Rail Body 1/4” from the vertical edges of the glass to ensure End Caps are flush when attached.
- After positioning, pull out the spacer blocks from each Rail Body and push the Rail Body clamps over the glass.
- Snug all pre-installed socket head cap screws on the Rail Bodies from left to right using a 3/16″ T-Handle Hex Key.
- Slide off the Side Cover.
ADJUSTABLE SLIDE BLOCK INSTALLATION
- Install the Adjustable Slide Block (DRX6K) by sliding it into the pivot end Rail Body cavity.
- Secure the Adjustable Slide Block with screws.
- Optionally, install the CRL 777S Lock on the swing side Rail Body.
DOOR CENTERING ADJUSTMENT
- Loosen the Set Screw closest to the pivot edge of the door to adjust the angle away from you.
- Tighten the furthest Set Screw from the pivot edge until the desired angle is reached.
- Tighten the Set Screw that was loosened (closest to the pivot) until it touches the Adjustable Slide Block.
- To adjust the angle towards you, follow similar steps in reverse.
LATERAL DOOR ADJUSTMENT The DRX Kwik-Adjust™ Pivot Alignment System allows lateral adjustment of the door. This adjustment changes the reveal between the edge of the door and adjacent fixed panel or jamb/wall.
SIDE COVER AND END CAP INSTALLATION
- Insert Gaskets (DRXG) along the top raceways of the Side Covers.
- Slide each Side Cover into the raceways along the Rail Bodies.
- Install the cylinder if a CRL 777S Rail Lock is being used.
- Install the End Caps by fastening the end cap screws to the Rail Bodies and Side Covers.
Conclusion
The CRL DRX™ Modular Door Rail System represents a significant advancement in the door rail industry. Its modular design, flexibility, and ease of installation make it a game-changer for glass temperers and glazing installers.
For immediate service or consultation, you may contact us at Allied Emergency Services, INC.
Contact Information:
- Phone: 1-800-792-0212
- Email: Info@AlliedEmergencyServices.com
- Location: Serving Illinois, Wisconsin, and Indiana with a focus on the greater Chicago area.
If you require immediate assistance or have specific questions, our human support is readily available to help you.
Disclaimer: This article is intended for informational purposes only. For professional advice, consult experts in the field.
⚡ Need Storm Damage Help? We Serve 155+ Cities
Allied Emergency Services provides 24/7 emergency restoration across Illinois, Wisconsin, Indiana, and Michigan. Text ESTIMATE to (844) 907-2546 for a free estimate in minutes.
Top service areas: Chicago • Naperville • Aurora • Kankakee • Joliet • Rockford • Schaumburg • Milwaukee • Madison • We’re Hiring!
⚡ Storm or Roof Damage? Get a FREE Estimate
Text ESTIMATE to (844) 907-2546
Or call (800) 792-0212 for 24/7 emergency response
AI-powered • No obligation • Licensed IL & WI
Need storm restoration and roofing help?
Allied Emergency Services — Licensed IL & WI Storm Restoration And Roofing Specialists
For 27 years, Allied has been serving Illinois and Wisconsin homeowners with storm restoration and roofing across Illinois and Wisconsin. IICRC-certified, EPA Lead-Safe, IL Licensed Roofing Contractor #104.019029. 24/7 emergency response.
Learn about our Storm Restoration And Roofing service →Free property assessment within 24 hours · No obligation · Insurance claim support