⚡ Storm or Roof Damage? Get a FREE Estimate
Text ESTIMATE to (844) 907-2546
Or call (800) 792-0212 for 24/7 emergency response
AI-powered • No obligation • Licensed IL & WI
Vinyl siding with integrated rigid foam is a high-efficiency wall insulation solution that offers several benefits for existing homes. High-efficiency wall insulation reduces energy waste, improving comfort and quiet in your home. Optimize your construction to meet or exceed future codes effectively.
Technical Description:
- Two Levels of Insulation: High-efficiency insulation meets the 2015 International Energy Conservation Code, while ultra-efficient insulation exceeds this code by 25%.
- Professional Installation: Proper installation is crucial, with no gaps, voids, or misalignment with air barriers. This creates conditioned spaces requiring minimal heating and cooling, ensuring comfort and quiet throughout the house.
Alternate Terms:
- Enhanced-Comfort Wall Insulation
- Enhanced-Quiet Wall Insulation
- Advanced Wall Insulation
- High-Efficiency or Ultra-Efficient Wall Insulation
Scope:
- Insulate existing walls by removing cladding and installing insulated vinyl siding.
- Inspect for moisture damage and address it as needed.
- Install water-resistive barriers and flashing.
- Follow manufacturer’s installation procedures.
Description:
- Insulated vinyl siding consists of vinyl siding with a permanently attached rigid foam backing (typically EPS).
- Benefits include improved energy performance, reduced thermal bridging, decreased wall sheathing moisture, enhanced airtightness, and improved aesthetics.
Existing Moisture Problems:
- Insulated vinyl siding should not be installed over walls with moisture problems.
- Thoroughly inspect for evidence of moisture damage.
- Address moisture issues before installation.
Water-Resistive Barrier (WRB):
- WRB sheds liquid water from behind cladding.
- Install horizontally with a 2-inch overlap.
- Ensure proper integration with flashing.
Flashing:
- Older homes may have inadequate or missing flashing.
- Add flashing when upgrading cladding, especially in homes without a WRB.
Exterior Foam Sheathing (Continuous Insulation):
- Exterior foam sheathing can be integrated into the system, but proper installation and location are essential.
Vapor Retarders and Air Barriers
Installing insulated vinyl siding with an interior vapor retarder can create a double vapor barrier, potentially causing moisture issues.
- Semi-Permeability of EPS-Foam Backing:
- Insulated vinyl siding has an EPS-foam backing that is semi-permeable.
- Despite semi-permeability, it creates an unvented cladding, limiting the wall sheathing’s ability to dry to the outside.
- Avoid Class I Vapor Retarder on Interior:
- It is not recommended to install insulated vinyl siding over walls with a Class I vapor retarder on the interior (e.g., polyethylene, vinyl wallpaper, closed-cell spray polyurethane foam).
- Installing over a Class I vapor retarder creates a double vapor barrier, hindering wall cavity drying in both interior and exterior directions.
- Inadequacy of R-2 Exterior Insulation Alone:
- Adding only R-2 of exterior insulation is insufficient to control vapor drive in walls without an interior vapor retarder or with a Class III vapor retarder in Climate Zones 5 and higher.
- Recommendations Based on Conditions:
- Table 1 provides recommendations on whether insulated vinyl siding should be installed based on factors such as the presence of an interior vapor retarder, climate zone, and use of exterior continuous insulation.
- Interior Vapor Retarder Inspection:
- During the initial inspection, check for the presence of an interior vapor retarder, if possible.
- If an interior polyethylene vapor barrier is found, advise the homeowner about the potential double vapor barrier issue.
- Vinyl wallpaper on exterior walls should be removed before installing insulated vinyl siding.
- Closed-cell spray polyurethane foam (cc SPF) in wall cavities can also create a double vapor barrier.
- Air Tightness Improvement:
- Installation of insulated vinyl siding can improve air tightness due to the requirement for foam backing of adjoining panels to be in contact.
- The exterior air barrier can be the house wrap, structural sheathing, or exterior foam sheathing.
- These materials must be effectively taped at seams and joints to serve as an air barrier.
How to Install Insulated Vinyl Siding
- Prepare the Wall Exterior:
- Remove existing cladding.
- Inspect for and repair any moisture damage.
- Inspect and Prepare the Substrate:
- Ensure the substrate is smooth.
- Pound or remove protruding nails.
- Scrape off and replace any loose caulk.
- Install Water-Resistive Barrier and Flashing:
- Integrate water-resistive barrier (house wrap) with flashing around windows and doors.
- Install rigid foam sheathing if project specifications require it.
- Install Starter Strip:
- Measure up from the top of the foundation 3 inches (or ¼ inch less than the width of the starter strip) and partially drive in a nail to mark the spot.
- Attach a chalk line and snap it to create a level guideline.
- Install the starter strip along the chalk line, fastening it every 8 to 12 inches, leaving ¼ inch gaps between sections for expansion.
- Install Corner Posts and Accessories:
- Use proper inside and outside corner posts.
- Outside corner posts should be specified for insulated vinyl siding.
- Install each corner post from the eave downwards, leaving a ¼-inch space at the top.
- Fasten corner posts every 8 to 12 inches.
- Install J Channels:
- Cut drip cap and notch it for flashing above windows.
- Cut side j-channels to the height of the window plus j-channel width.
- Install j-channel flush against windows or doors with fasteners every 8 to 12 inches.
- Bend tabs on drip cap and side trim j-channels for proper flashing.
- Install the First Course of Siding Panels:
- Engage the bottom of the siding panel with the starter strip and slide it into the corner post pocket.
- Maintain a ¼-inch gap between the end of the panel and trim if the temperature is above 40°F.
- Fasten the first panel in the center of the nail hem slot, leaving a 1/32-inch clearance.
- Slide subsequent panels together until foam backings meet.
- Cut and Seal Around Fixtures and Protrusions:
- Follow common cutting procedures for protrusions.
- Install premade gaskets or flashing around protrusions integrated with the water-resistant barrier.
- Cut and Fit Panels Around Windows:
- Measure and mark dimensions of the window on the panel, adding ¼ inch to all sides for expansion.
- Cut the panel with a utility knife and tin snips.
- Crimp the cut edge with a snap lock punch and create nail slots.
- Install the panel with the bottom edge locking into the top edge of the panel below.
- Install Final Course and Soffit:
- Final course meets soffit panels.
- Secure the final panel with shimmed utility trim and fasteners not more than every 16 inches.
Special Insulated Vinyl Siding Installation Considerations
- Fasteners:
- Code-minimum fastener for insulated vinyl siding is a 0.120 shank nail with a 0.313 head or a 16-gauge crown.
- Fastener should be long enough to penetrate the sheathing or substrate and framing by at least 1¼ inches.
- If foam sheathing is used, nail length should accommodate the foam thickness.
- Manufacturer’s specifications for fasteners should be followed, especially if installing over exterior foam sheathing.
- IRC Table R703.15.1 and Table R703.15.2 provide requirements for fastening cladding to foam sheathing or using furring.
- Furring Strips:
- For insulated vinyl siding to be considered continuous insulation, it must be installed directly over a water-resistive barrier and sheathing.
- If furring strips are used for even installation, the space between them should be filled with rigid insulation or approved material.
- Note that some manufacturers may not allow their product to be installed over furring strips.
- Field-Cut Lapping:
- It is recommended to lap only factory-cut ends for insulated vinyl siding.
- If lapping a field-cut end is necessary, remove ¾ inch of foam backing from the field-cut end.
- The factory-cut panel should be the overlapping panel.
Always refer to the manufacturer’s guidelines and specific product requirements for the best practices during installation
Ensuring Success When Installing Insulated Vinyl Siding
- Assess and correct moisture problems before installation.
- Avoid double vapor barrier conditions by removing interior vapor retarders.
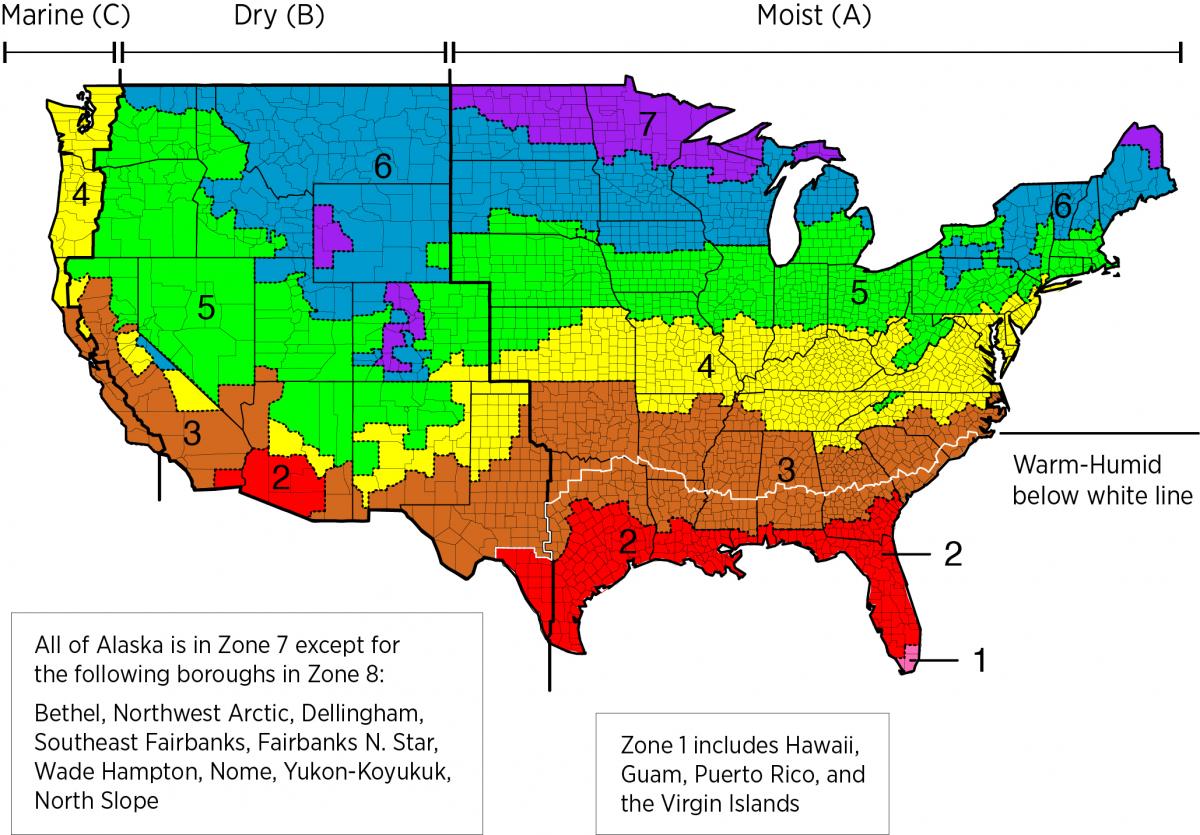
Climate:
- Consider the climate and regional building codes when choosing insulation options.
Compliance with Codes and Standards
ENERGY STAR Single-Family New Homes, Version 3/3.1 (Rev. 11):
- Thermal Enclosure System Compliance.
- Reduced Thermal Bridging Requirement.
- 3.4: Above-grade walls separating conditioned from unconditioned space.
- 3.4.1: Continuous rigid insulation, insulated siding, or combination, with R-value requirements (≥ R-3 in CZ 1-4; ≥ R-5 in CZ 5-8).
DOE Zero Energy Ready Home (Revision 07):
- Mandatory Requirements.
- Exhibit 1, Item 1: Certification under ENERGY STAR.
- Exhibit 2, Item 2: Insulation levels meeting or exceeding 2015 IECC with Grade 1 installation.
2009-2021 IECC and IRC Insulation Requirements Table:
- Minimum insulation requirements for ceilings, walls, floors, and foundations in new homes as per the specified IECC and IRC editions.
2009 and 2012 International Energy Conservation Code (IECC):
- Section R303.1.1: Insulation labeling and certification.
- Table R402.1.1: Minimum R-values for wood-framed walls.
- Table R402.1.3: Equivalent frame wall U-factors.
- Table 402.4.1: Continuous air barrier requirement.
2015, 2018, and 2021 IECC:
- Section R202: Definitions for continuous insulation and insulated siding.
- Section R303.1.1: Insulated siding labeling with R-value.
- Section R303.1.4.1: Insulated siding R-value determination (ASTM C1363).
- Table R402.1.2: Minimum R-values for wood frame walls.
- Section R402.1.3: Reduction of insulated siding’s R-value if used for continuous insulation.
- Section R402.1.2: Equivalent frame wall U-factors for energy simulations.
2009, 2012, 2015, 2018, and 2021 International Residential Code (IRC):
- Section R702.7 (R601.3 in 2009 IRC): Interior vapor retarder requirements.
- Table R702.7.1 (Table R601.3.1 in 2009 IRC): Vapor retarder exception if continuous insulation requirements met.
- Section R703.2: Water-resistive barrier installation.
- Table R703.3(1) (Table R703.4 in 2009 and 2012 IRC): Nail requirements.
- Section R703.13 (R703.11 in 2009 and 2012 IRC): Insulated vinyl siding certification (ASTM D7793).
- Section R703.15 (R703.11.2 in 2012 IRC): Cladding specifications for installation over foam sheathing.
Retrofit (2009, 2012, 2015, 2018, and 2021 IECC and IRC):
- Section R101.4.3 (in 2009 and 2012): Requirements for alterations, renovations, and repairs.
- Chapter 5 (in 2015, 2018, 2021): Control of alterations, repairs, additions, and changes in occupancy of existing buildings and structures.
American Society for Testing Materials (ASTM) C 1363 – 11:
- Standard Test Method for Thermal Performance of Building Materials and Envelope Assemblies by Means of a Hot Box Apparatus.
ASTM D 7793 – 13:
- Standard Specification for Insulated Vinyl Siding with thermal insulation value requirements (R-2.0 or greater) and other performance criteria.
Federal Trade Commission (FTC) Regulation 16 CFR Part 460:
- Federal regulation governing the labeling and advertising of home insulation products.
Remember that professional installation and attention to detail are crucial for the effectiveness of this insulation method. For more specific guidance, consult with an experienced contractor or insulation specialist.
For immediate service or consultation, you may contact us at Allied Emergency Services, INC.
Contact Information:
- Phone: 1-800-792-0212
- Email: Info@AlliedEmergencyServices.com
- Location: Serving Illinois, Wisconsin, and Indiana with a focus on the greater Chicago area.
If you require immediate assistance or have specific questions, our human support is readily available to help you.
Disclaimer: This article is intended for informational purposes only. For professional advice, consult experts in the field.
⚡ Need Storm Damage Help? We Serve 155+ Cities
Allied Emergency Services provides 24/7 emergency restoration across Illinois, Wisconsin, Indiana, and Michigan. Text ESTIMATE to (844) 907-2546 for a free estimate in minutes.
Top service areas: Chicago • Naperville • Aurora • Kankakee • Joliet • Rockford • Schaumburg • Milwaukee • Madison • We’re Hiring!
⚡ Storm or Roof Damage? Get a FREE Estimate
Text ESTIMATE to (844) 907-2546
Or call (800) 792-0212 for 24/7 emergency response
AI-powered • No obligation • Licensed IL & WI
Need siding help?
Allied Emergency Services — Licensed IL & WI Siding Specialists
For 27 years, Allied has been installing and restoring siding across Illinois and Wisconsin. IICRC-certified, EPA Lead-Safe, IL Licensed Roofing Contractor #104.019029. 24/7 emergency response.
Learn about our Siding service →Free property assessment within 24 hours · No obligation · Insurance claim support