⚡ Storm or Roof Damage? Get a FREE Estimate
Text ESTIMATE to (844) 907-2546
Or call (800) 792-0212 for 24/7 emergency response
AI-powered • No obligation • Licensed IL & WI
At Allied Emergency Services, Inc., we understand the importance of using top-quality materials and following the best installation practices. That’s why we want to share crucial insights from the James Hardie Best Practices – Installation Guide. This guide is an invaluable resource for ensuring optimal performance and longevity of James Hardie siding and trim products.
Key Points:
Climate-Specific Engineering: James Hardie’s unique HardieZone® System offers products engineered specifically for different climates, ensuring maximum durability and performance
Zone-Specific Installation Instructions: Tailored guidelines are provided for specific climate zones, available on James Hardie’s website using their zip code tool. This ensures that the right product and installation methods are used for your specific area
Safe Storage: Store James Hardie products off the ground and covered, especially in outdoor settings. This prevents moisture damage and maintains product integrity
Silica Dust Safety: When cutting or grinding James Hardie products, it’s vital to manage silica dust in accordance with OSHA standards. This is crucial for the health and safety of workers
Effective Flashing: Use 6-inch wide flashing behind butt joints to protect against water entry. This is an essential step for ensuring the longevity of the siding
Appropriate Tools: The right tools, both power and hand tools, are necessary for proper installation. James Hardie recommends specific tools and fasteners for their products
Essential Nail and Pin Guns for James Hardie Siding and Trim Installation
When it comes to installing James Hardie products, using the right tools is crucial for both efficiency and durability. Pneumatic nail guns are versatile and can be used to attach James Hardie products to wood, steel, or masonry substrates. For HardieTrim® board, finish nail guns are recommended. Here are some examples of commonly used nail guns for specific applications:

- Hitachi Nail Guns:
- NT65A2: 2½ inch 16 gauge Finish Nailer.
- NV65AH: 2½ inch Siding Nailer.
- NV45AB2(S): 1¾ inch Coil Roofing Nailer.
- NV75AG: 3 inch Coil Nailer.
- Dewalt Nail Guns:
- D51257K: 1¼ inch – 2½ inch 16 Gauge Straight Finish Nailer Kit.
- ET&F Fastening Systems Nail Guns:
- 500, 510, 610: Nailers to Steel Studs.
- 110: Finish Nailer to Steel Studs.
- Duo-Fast Nail Guns:
- P275C: Siding Coil Nailer.
- Porter Cable Nail Guns:
- COIL250: 2½ inch Coil Nailer.
- Aerosmith Fastening Systems:
- ST4100/ST4200: Nailer to Steel Studs.
- HN120: Nailer to Masonry.
Framing and Sheathing Best Practices for James Hardie Products
Stud Spacing and Sheathing Requirements:
- James Hardie siding and trim products can be installed over braced wood or steel studs, which should be spaced at a maximum of 24 inches on center.
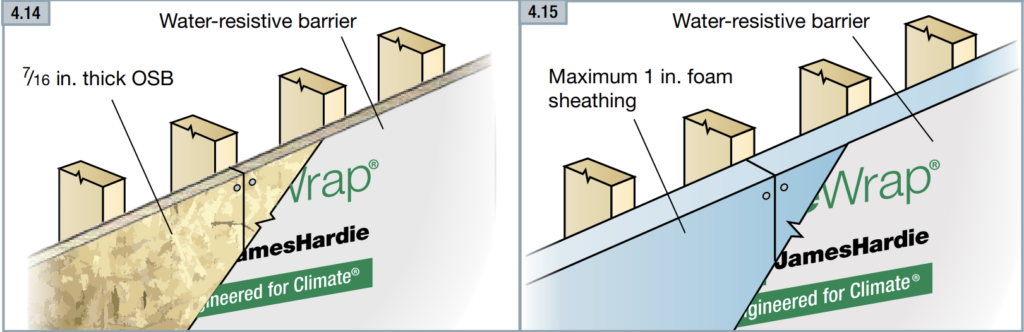
- They can be directly attached to 7/16 inch thick OSB (Oriented Strand Board) or equivalent sheathing.
- Installation is also possible over solid-foam insulation boards up to 1 inch thick.
Surface Preparation:
- It’s important to correct any irregularities and unevenness in framing, sheathing, foam, and other wall assembly components before installation. This includes addressing under-driven nails, as these can cause imperfections to telegraph through to the finished siding and trim.
Specifics for Steel Stud Installation:
- When installing over steel studs, James Hardie requires a minimum of 20 gauge steel.
- For pin attachment to steel, ensure the material is held tight to the framing while driving the pin. Do not hit the pin a second time with a hammer after driving it into the steel, as this can reduce the pin’s holding capacity. If the pin is not set properly, it should be removed and replaced.
- For screw attachment, use a self-tapping screw with a cutting edge that drills away the material, creating a hole for the screw. Wing-tipped screws that bore out the fiber cement and break off as the screw enters the steel are also acceptable.
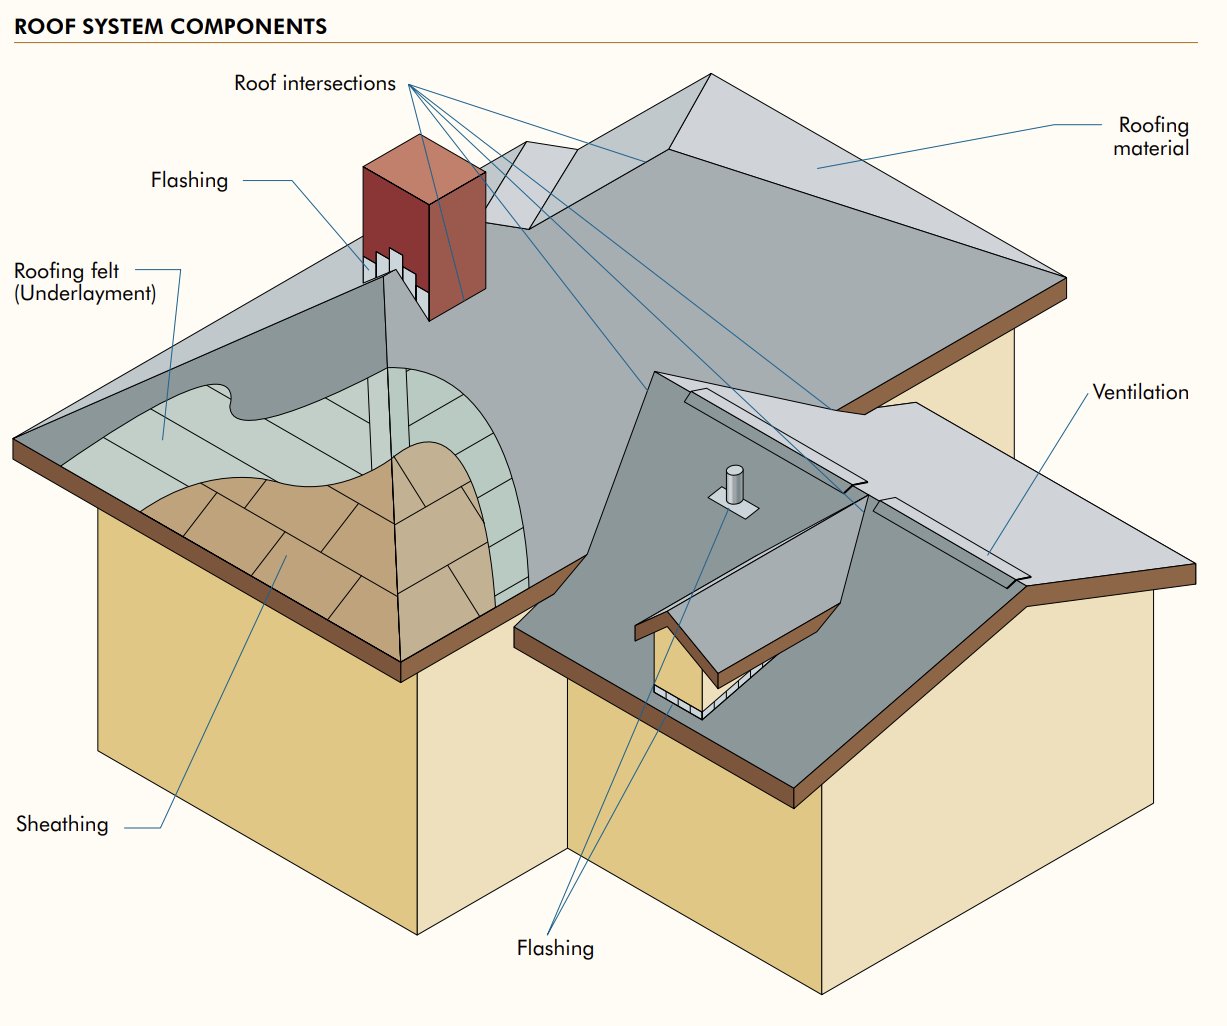
Installation of HardieWrap® Weather Barrier:
- The weather barrier should be affixed taut and flat with a minimum vertical overlap of 6 inches, and the vertical seam must be taped. HardieWrap Seam Tape is highly recommended.
- Care should be taken not to clog or interfere with weep holes or similar drainage details during the installation of the weather barrier
- Prioritize Safety: Install HardieWrap weather barrier before windows and doors. Avoid using it on saturated sheathing, and be cautious as it can become slippery and should not be used where it might be walked on.
- Starting Point: Begin by affixing the weather barrier at least 6 inches around a building corner. Unroll it horizontally, covering rough window and door openings.
- Fastening: Attach the weather barrier to studs or nailable sheathing material using galvanized construction-grade staples. Ensure it’s taut and flat, with vertical overlaps of a minimum of 6 inches. The vertical seam must be taped, and HardieWrap Seam Tape is strongly recommended. Avoid clogging or interfering with weep holes or similar drainage details
General Requirements and Design Considerations:
- Moisture Management: The wall construction design must effectively manage moisture, taking into account both the interior and exterior environments of the building. This is particularly crucial in buildings at higher risk of wind-driven rain penetration and in conditioned spaces
- Flashing and Details: Incorporate appropriately installed HardieWrap Pro Flashing and HardieWrap Flex Flashing, or other recommended flashing details, at wall openings, penetrations, junctions, connections, window sills, headers, and jambs.
- Timeline for Covering: HardieWrap weather barrier is intended for vertical wall applications and must be covered within 180 days of installation
General Installation Requirements for James Hardie Siding and Trim
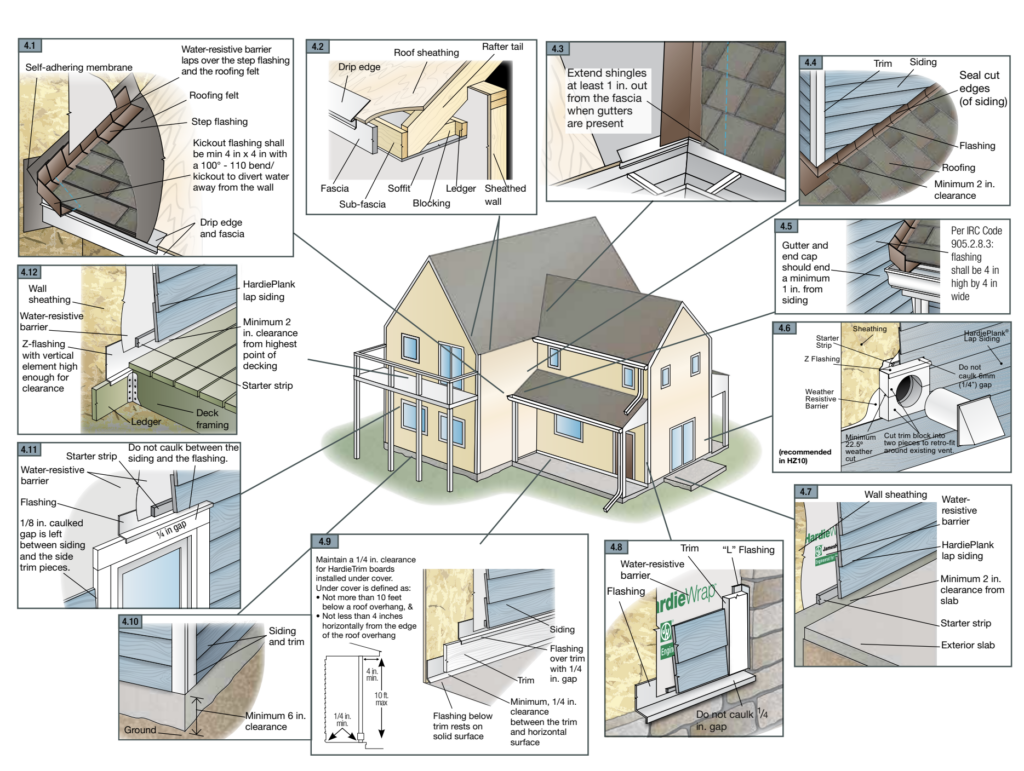
Site Grading and Moisture Management: Ensure that the ground adjacent to the foundation slopes away from the building, at a minimum distance of 10 feet, to prevent water accumulation. This prevents moisture-related issues and enhances the durability of the siding
Clearance from Ground: James Hardie products should have a minimum clearance of 6 inches from the ground. This clearance may be increased based on local building codes to prevent moisture absorption and damage
Siding to Flashing Clearance: A quarter-inch clearance must be maintained between the siding and any horizontal flashing. This spacing ensures proper drainage and prevents moisture pooling on top of the flashing, which is crucial for moisture management

Clearance from Solid Surfaces: A clearance of 2 inches is necessary where James Hardie siding and trim products meet roofs, decks, paths, steps, driveways, or any other solid surfaces. This prevents direct contact and potential water damage
Under-Cover Clearance for Trim Boards: For HardieTrim boards installed under cover (not more than 10 feet below a roof overhang and not less than 4 inches horizontally from the edge of the roof overhang), maintain a quarter-inch clearance. This spacing is essential for adequate ventilation and moisture prevention
Fastening Techniques: James Hardie siding and trim can be hand-nailed or pneumatically fastened. Pneumatic nailing is recommended for speed and consistency, with nails driven snug or flush with the siding surface. Avoid using staples for attachment and opt for stainless steel fasteners for the best results
General Fastener Requirements for James Hardie Siding and Trim Installation
Product-Specific Fastener Requirements:
- Each product section in the James Hardie Installation Guide contains specific fastener requirements. It’s crucial to refer to these details for the particular product you are installing.
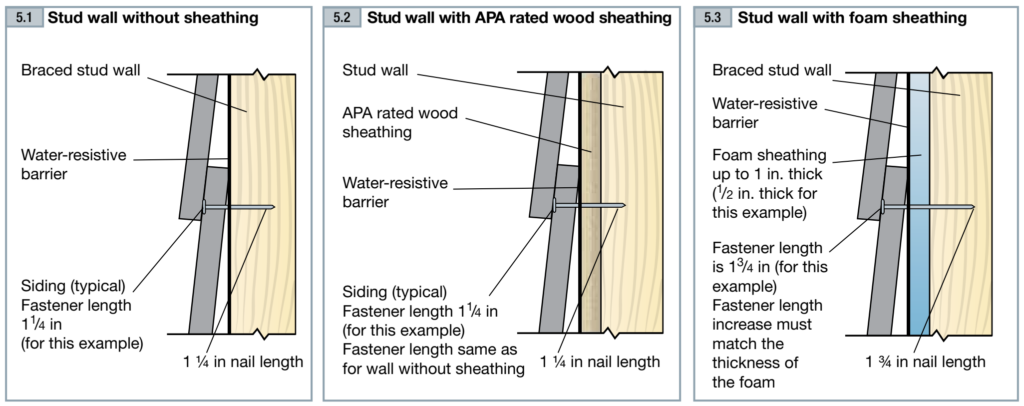
Fastener Length Adjustment for Non-Structural Sheathing:
- If you’re installing siding over non-structural sheathing like foam, gypsum, or builder board, the fastener length should be increased by the thickness of the sheathing. For instance, if you’d normally use a 1¼ inch fastener, but the siding is being installed over ½ inch foam sheathing, you should use a 1¾ inch fastener instead.
Fastener Length for Structural Sheathing:
- For siding installations over a framed wall with structural sheathing such as plywood or OSB, there’s no need to increase the fastener length.
Avoiding Overdriving Nails Over Foam Sheathing:
- Special care must be taken when installing siding over foam sheathing. Avoid overdriving the nails and compressing the foam, as this can lead to wall unevenness, potentially distorting the siding and giving the wall a wavy appearance.
Fastener Material:
- Stainless steel fasteners are recommended for installing James Hardie products. They offer superior durability and resistance to corrosion, ensuring a long-lasting installation.
Avoiding Staples:
- Never use staples to attach James Hardie products. Staples do not provide the same level of holding power and can damage the integrity of the siding and trim.
Pneumatic Fastening for James Hardie Siding and Trim
Hand-Nailing vs. Pneumatic Fastening:
- James Hardie siding and trim products can be either hand-nailed or fastened pneumatically. However, using a pneumatic nailer is recommended for its speed and consistency.
Nail Depth:
- Nails should be driven snug or flush with the surface of the siding. When using a pneumatic nailer, set the air pressure so that the nails are driven to the appropriate depth. Using a flush mount attachment on the head of the nailer is advised for achieving the correct depth.
Adjusting Nail Depth:
- If setting the nail depth is challenging, opt for a setting that slightly under-drives the nails. Then, use a smooth-faced hammer to drive any under-driven nails snug to the surface.
- If nails are driven too deep, countersink them with a nail set, fill the hole, and then drive another nail nearby to the correct depth.
Managing Penetrations in James Hardie HZ10 Installations
Wires, Conduit or Other Fixed Pipe:
- For small penetrations such as wires, electrical conduit, and pipes less than 1½ in. in diameter (excluding hose bibs) no blocking is necessary. The circumference of pipe or wire should be sealed with a barrier foam and/or caulked.
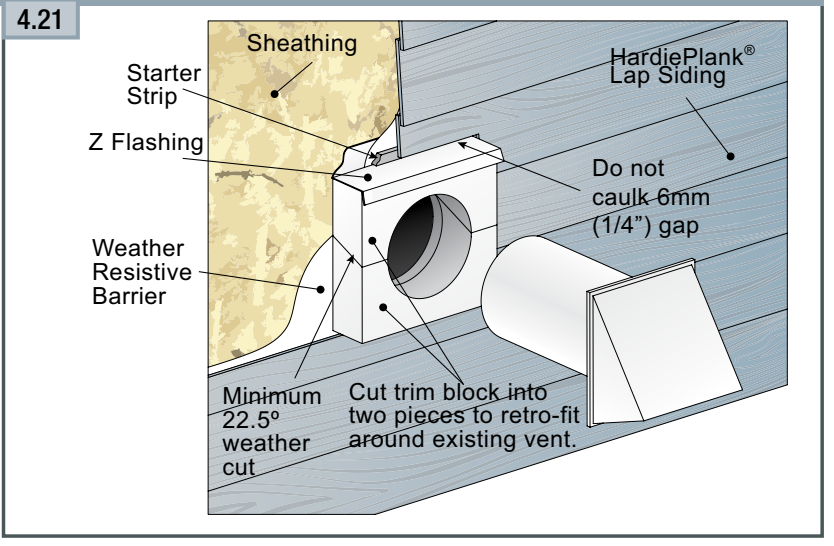
Blocking for Large Penetrations:
- For penetrations 1½ inches in diameter or larger, like dryer vents, install a block of HardieTrim® 5/4, 4/4 boards around the penetration. The blocking should have a radius at least 3 inches greater than the radius of the penetration.
Installation Techniques for Blocking:
- If you need to install a block around an existing vent pipe, you may have to cut the block into two pieces. Use a weather-cutting technique to fit the trim block into place. Once installed, ensure to install flashing over the top of the trim block for additional protection.
Restoring the Weather-Resistant Barrier:
- When cutting holes for penetrations, it’s essential to restore the weather-resistant barrier of the home. This can be done using various pre-made blocking and flashing products, such as Sturdimount®. Make sure to follow all manufacturers’ installation instructions for these products.
Seam Taping:
- Use HardieWrap Seam Tape on the lower layer of the weather barrier to ensure a complete and secure seal around the area of the penetration
Conclusion: Following these guidelines from James Hardie ensures that our clients receive the best service and results. For detailed installation procedures and the latest updates, we recommend consulting the full James Hardie Installation Guide. At Allied Emergency Services, Inc., we are committed to delivering excellence in every project, ensuring our clients’ properties are restored with the utmost care and professionalism.
For immediate service or consultation, you may contact us at Allied Emergency Services, INC.
Contact Information:
- Phone: 1-800-792-0212
- Email: Info@AlliedEmergencyServices.com
- Location: Serving Illinois, Wisconsin, and Indiana with a focus on the greater Chicago area.
If you require immediate assistance or have specific questions, our human support is readily available to help you.
Disclaimer: This article is intended for informational purposes only. For professional advice, consult experts in the field
⚡ Need Storm Damage Help? We Serve 155+ Cities
Allied Emergency Services provides 24/7 emergency restoration across Illinois, Wisconsin, Indiana, and Michigan. Text ESTIMATE to (844) 907-2546 for a free estimate in minutes.
Top service areas: Chicago • Naperville • Aurora • Kankakee • Joliet • Rockford • Schaumburg • Milwaukee • Madison • We’re Hiring!
⚡ Storm or Roof Damage? Get a FREE Estimate
Text ESTIMATE to (844) 907-2546
Or call (800) 792-0212 for 24/7 emergency response
AI-powered • No obligation • Licensed IL & WI
Need storm restoration and roofing help?
Allied Emergency Services — Licensed IL & WI Storm Restoration And Roofing Specialists
For 27 years, Allied has been serving Illinois and Wisconsin homeowners with storm restoration and roofing across Illinois and Wisconsin. IICRC-certified, EPA Lead-Safe, IL Licensed Roofing Contractor #104.019029. 24/7 emergency response.
Learn about our Storm Restoration And Roofing service →Free property assessment within 24 hours · No obligation · Insurance claim support